


All kinds of weird things can happen to a USB Flash drive. You may find that the USB drive cannot be opened or the file saved in it cannot be opened or even disappear. Or you find strange files with various unfamiliar file extensions in your USB drive and you cannot delete it. What's going wrong and how can you solve it? It is time to format your USB Flash drive.
How to Format A USB Drive to FAT32, NTFS, exFAT, or EXT4
! Warning: Before formatting, you must back up the files you want to reserve in the flash drive. If you accidentally format your USB drive without backing up important files, you can download FonePaw Data Recovery (opens new window) to restore your data. (Further instructions can be accessed at the end of the article)
-
Plug in the USB drive.
-
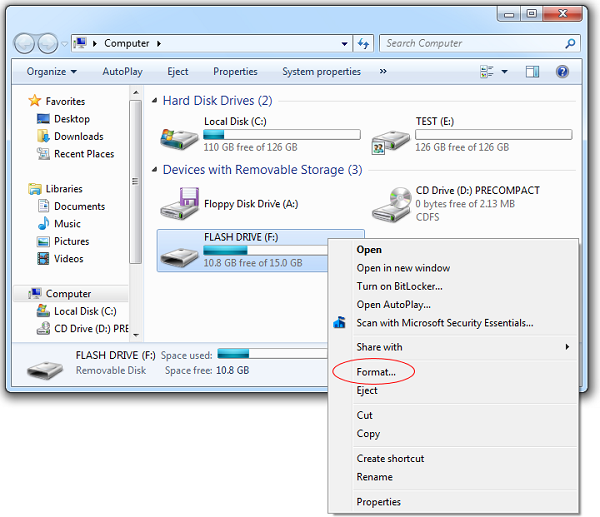
Open Windows File Explorer and go to This PC (aka Computer or My Computer).
-
Right-click the drive, and select Format…
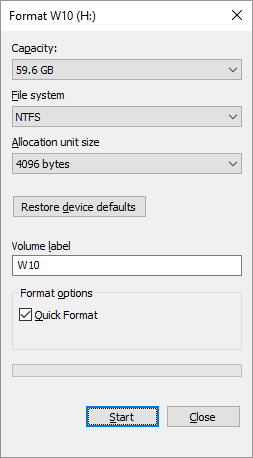
- Select a right File system ( FAT32, NTFS, exFAT), Allocation unit size, Volume label, and Format options. Then click Start, followed by OK to confirm that you want to erase all data in your USB drive and format it.
How to Choose File System?
-
NTFS: The NT File System (NTFS) is the file system that modern Windows versions use by default. It can read and write file larger than 4 GB and is more suitable for hard drive on 32 GB and more. But NTFS is usually not recommended for USB Flash drives.
-
FAT32: The File Allocation Table 32 (FAT32) was the standard Windows file system before NTFS. It is widely compatible with different devices, small in size and fast in reading and writing data. But it doesn't support large files. So if you doesn't use your USB drive to store files larger than 4GB, format the drive to FAT32.
-
exFAT: The extended File Allocation Table (exFAT) builds on FAT32 so that it has a smaller size and a faster read/write speed while it can read and write large files like NTFS. So if your USB drive is usually used to store files bigger than 4GB, exFAT is a good choice for you.
How to Choose Allocation Unit Size?
Allocation unit or data cluster is the unit of disk space for storing files. Therefore the size of it determines the smallest unit size that a file can store in. Supposing the size of a file is 5000 Bytes and allocation unit size is 4096 Bytes, then this file will take up two units whose size is in fact 8192 Bytes (4096*2). As you can see, there is much space wasted in these 2 units. So the smaller the allocation unit is, the more drive space is saved. However, smaller allocation unit will lower the speed of reading and writing files stored in your drive since it takes more time to read more units. Overall speaking, if you have a large drive or considerable large files, choose a large allocation unit size, vice versa.
What Is a Volume Label?
Volume label is the name you can give to your flash drive just like the name given to your PC. You can name it after your nickname or your pet name. It's totally up to you as long as youobey the naming rules of your file system. General speaking, drive names should not include tabs, certain symbols (FAT system) with a limited amount of characters.
After formatting, your flash drive will be like a brand-new one without any problem. However, some people's computer may not be able to format a USB drive like the following example.
Fix "Can't Format USB Flash Drive" Error
If you come into this error, the best method is to use CMD. Let's start!
Step 1 Connect USB drive that cannot be formatted to your PC.
Step 2 Press [Win] + [R] to open Run dialog.
Step 3 Type in: diskpart and hit [Enter] to open a black window.
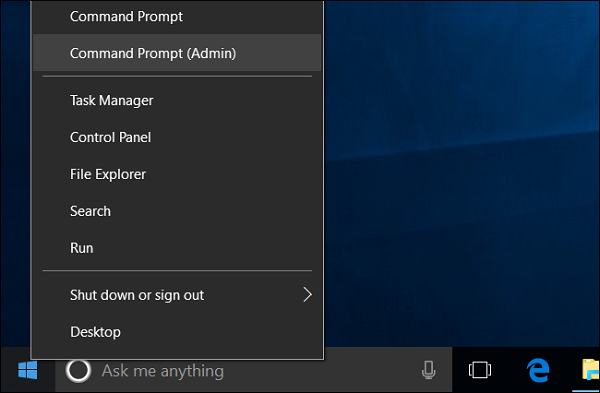
Note: On Windows 10 or 8.1, You can also open diskpart by right-clicking the Start button (or press Windows Key + X), selecting "Command Prompt (Admin)". Then input diskpart and hit [enter].
Step 4 Type in: list disk and hit [Enter] to display all disks on your computer
Step 5 Type in: select disk x(x is the number of your USB drive. Usually the number of PC hard disk is 0 and external USB drive is 1 when only 1 flash drive is plugged in); hit [Enter].
Step 6 Type in: clean and hit [Enter]
Step 7 Type in: create partition primary and hit [Enter]
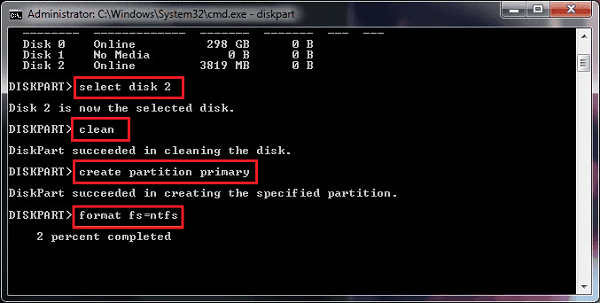
Step 8 Type in: format fs = fat32 or format fs = ntfs quick and hit Enter to reset USB drive to FAT32 or NTFS
Step 9 Close the window to finish the process.
If your important data is erased without backup, it doesn't mean you cannot find it back. Using FonePaw Data Recovery can help you recover your data from formatted USB flash drive quickly. Let's see how to use it.
How to Recover Formatted Files in USB Drive
FonePaw Data Recovery (opens new window) is an easy-to-use yet powerful app with many highlights for data recovery. For its concise and user-friendly interface layout, you can quickly start it without any tutorial.
Step 1: Download FonePaw Data Recovery based on your PC system and install it.
Free Download Buy with 20% off
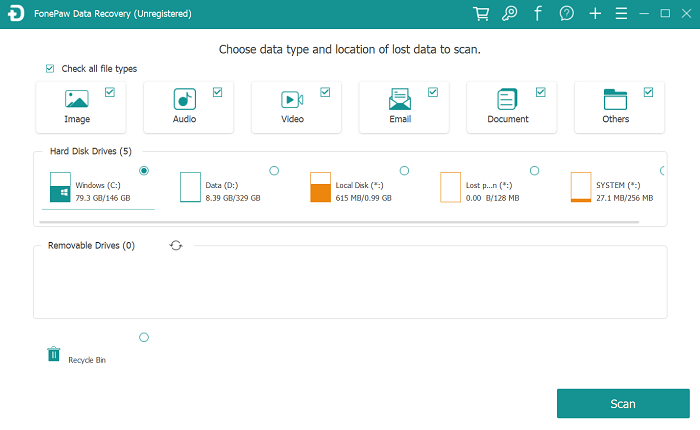
Step 2: Connect your USB drive to PC; Launch the software and select your USB drive in the Removable Drives list and data type to scan.
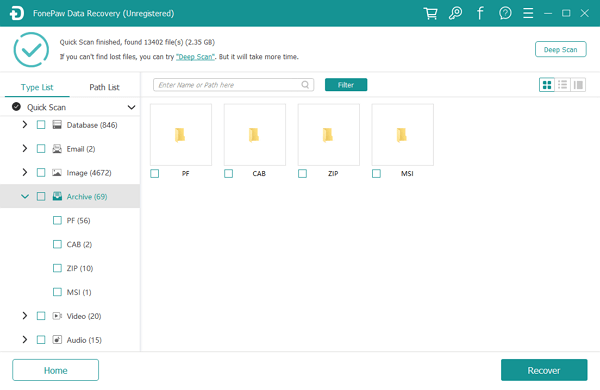
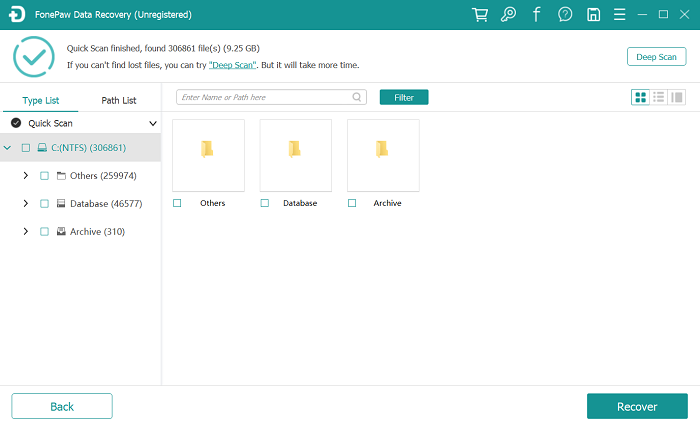
Step 3: Click "Scan" on the right bottom corner and a quick scan will be started. Then you can check your deleted files by Type List and Path List, which categorize the data according to their types/formats and location.
Note: If you are not satisfied with the quick scanned results, turn to "Deep Scan" by clicking "Deep Scan" on the right top to find more data. This process may cost more time so please be patient to wait.
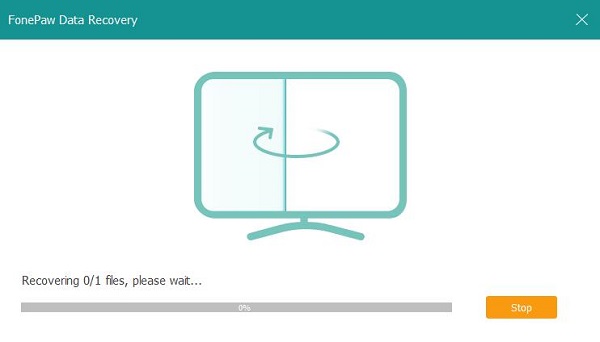
Step 4: After all types of data are listed, choose the data you want to recover and click "Recover" in the right bottom. There is a search bar above files for you to locate the files by entering name or path.
Highlights:
-
Quick Scan VS Deep Scan - Two modes are offered: scan the files in fast speed or deeply scan with high success rate.
-
Preview Available Before Recovery - Before recovery, you can preview all scanned results, which won't let you restore files that you don't need.
-
100% Secure- No data loss and completely and safely extract your data on PC without hassles.
Thanks for your reading! If you feel it useful, share it with your friends.