


Although iTunes is a versatile tool for Apple devices that enables you to do a lot of things in this single software, such as purchasing songs, enjoying music, syncing or transferring files, etc., it has to say that it’s not very user-friendly.
For example, if you want to transfer files from iPhone to iTunes, you may find it hard to figure out how to operate it. Or you manage to connect your iPhone to iTunes, tap the iPhone icon at the top, and begin to use File Sharing to transfer files, you may still feel it's complex and restricted.
So, it's better to seek for an alternative to transfer files from iPhone to your PC without iTunes. Here we will show you 5 methods, and each will be with a step-by-step guide.
Transfer Files from iPhone to PC with FonePaw DoTrans
Supported files: Photos, Music, Videos, Contacts, Messages, etc.
Compared to iTunes which sets limitations to the file types for transferring and is not that easy to operate, a third-party tool that supports multiple file types, simple and flexible to use, and provides more practical features is the best alternative.
Free Download Buy with 20% off
FonePaw DoTrans is an optimal choice. It’s a data transferring tool that is specially designed for transferring files between iOS devices, Android phones, and PCs. With this tool, you can quickly and smoothly transfer a variety of files from your iPhone to PC, PC to iPhone, Android to PC, or even iPhone to Android, and it requires no Internet connection.
Most of the files on your iPhone are perfectly supported by FonePaw DoTrans, including photos, music, videos, contacts, messages, etc. Besides transferring iOS data, this program is also useful when you want to backup files or make ringtones.
 Note:
Note:
- If you prefer to get a data transferring program that supports not only PCs but also Macs, you can have a look at FonePaw iOS Transfer. It boasts similar features with FonePaw DoTrans, but is more specially made for transferring iOS data. So, it doesn’t support Android devices, but can transfer more iOS files like books, memos, calendars, and messages of third-party apps.
Free download the trial version of FonePaw DoTrans and check the below steps to transfer files from iPhone to Windows 11/10/8/7.
Free Download Buy with 20% off
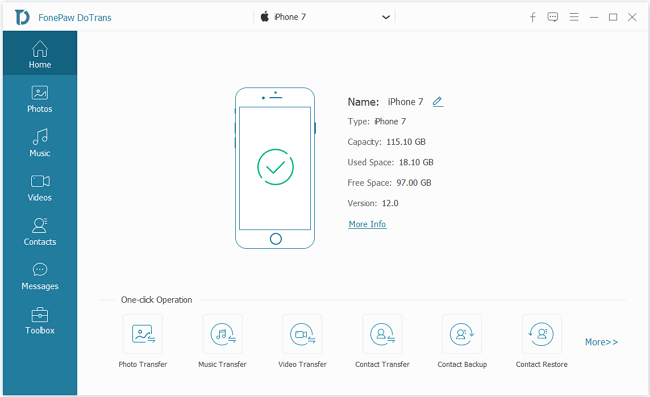
Step 1. Install the software and connect your iPhone
First of all, you need to download the program and install it on your PC. Now, connect iPhone to the computer via a USB cable. This program will detect your device automatically and what files within it should also appear.
Tips:
- Why My iPhone Cannot Be Detected? Or Why I can't connect successfully?
- To resolve the issue of a connection failure, please try:
- 1.Change another USB cable.
- 2. If you have no iTunes installed on PC, download it when you first use FonePaw DoTrans.
- 3.Keep the network stable and keep your iPhone awake. When connecting to PC, tap "trust".
- 4.Download the latest version of the software again and reinstall it.
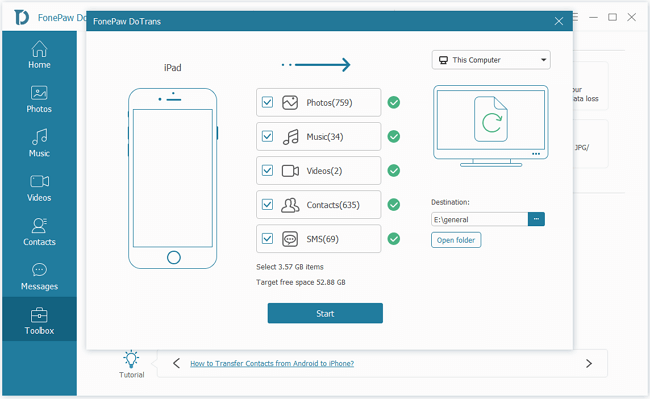
Step 2. Transfer files from iPhone to PC
As you can see, all iPhone content such as Music, Video, Photos, SMS, Contacts are shown on the left column. You can transfer all iPhone files to a computer or selectively transfer them.
Transfer all files from iPhone to PC:
On the main window, you can see the option "Device to folder". Simply clicking it, please select a folder on your computer to save these being transferred files (Music, Videos, Photos, Contacts, SMS). This is the quickest way to transfer files from iPhone to computer.
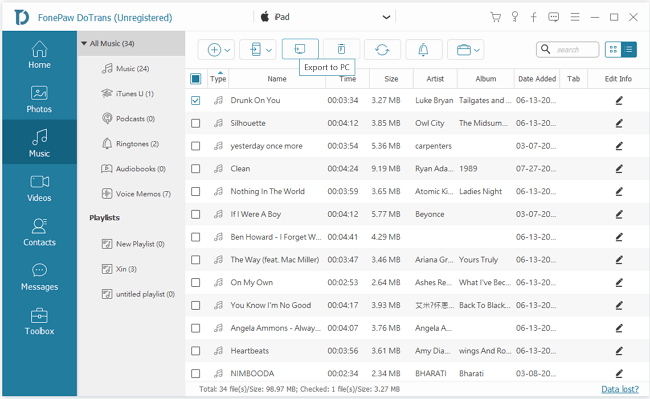
Selectively transfer files from iPhone to computer:
Here we take transferring music from iPhone to PC as an example. Click "Music" in the left sidebar. Then check those songs you want to transfer from iPhone to PC and click "Export to PC". In the pop-up window, choose a folder on your computer to save these songs.
Step 3. Get iPhone files on computer
After choosing the target folder on PC, the program will transfer the files you selected at once and show you the progress bar. When the transfer is finished, you will view iPhone files to PC.

With just a few clicks, FonePaw DoTrans makes it easy for you to get your iPhone data to your computer. You can apply the same way to transfer contacts, messages, movies, videos and more from iPhone/iPad/iPod to your PC or Mac. By the way, this program also allows you to transfer files from PC to iPhone, transfer files from iPhone to Android. If you have a need, just go ahead and have a try.
Free Download Buy with 20% off
Transfer Files from iPhone to Computer via iCloud
Supported files: Photos, Contacts, Notes, Reminders, Calendars, etc.
To transfer files from iPhone to PC, iCloud Drive is also a good choice. It’s common that most people use the iCloud service to do a backup, so it’s easy to download the files to your PC that you have uploaded to iCloud from iPhone.
Note:
- As you know, Apple only offers 5GB free storage for iCloud. So the files that can be stored are limited. If you need more space, you may need to purchase a plan.
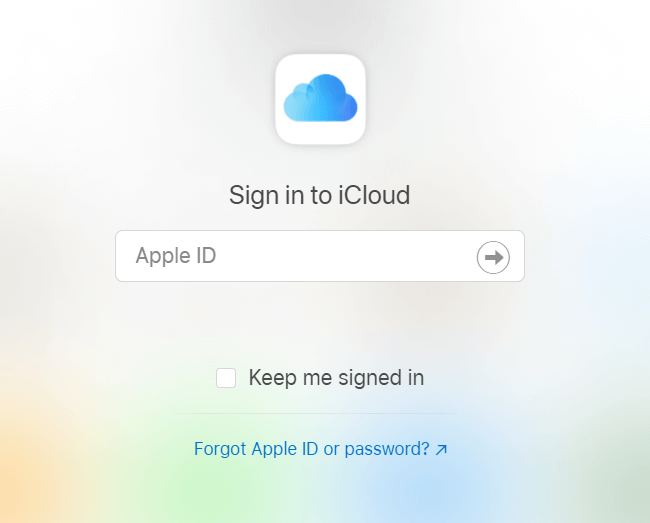
Step 1 Open iCloud.com on your PC (actually you can also do it on Mac).
Step 2 Sign in iCloud with your Apple ID and password.
Step 3 You will be displayed the file categories on the main interface. Preview and select the files you want to save, and download them to your PC.
Besides iCloud.com, there’s also an iCloud application for Windows. You can also transfer files from iPhone to PC with this app in similar steps.
Tips:
- You may sometimes find your photos one your iPhone are not available. That’s usually because you have enabled iCloud Photo Library and all your photos are stored in iCloud to save the phone space. If you want to keep the resolution of photos or videos, go to Settings in your iPhone > Photos > Download and Keep Originals.
Transfer Files from iPhone to PC by a Shared Folder
Supported files: documents, pictures, songs, zips, etc.
Don’t know if you hear about it or now, actually, Apple has introduced a practical feature named “Connected to SMB server” in the Files app from iOS 13. It might seem unfamiliar, but this feature can be very helpful when you want to transfer files from iPhone to your PC.
Note:
- SMB (Server Message Block) is a communication protocol that enables file sharing in a LAN (Local Area Network). It means that if you connect your iPhone and your computer under the same network, and enable this service in the Files app, you will be able to freely share files between the two devices via a shared folder.
Step 1 Create a new folder on your PC desktop and name it, for example, “Share”.
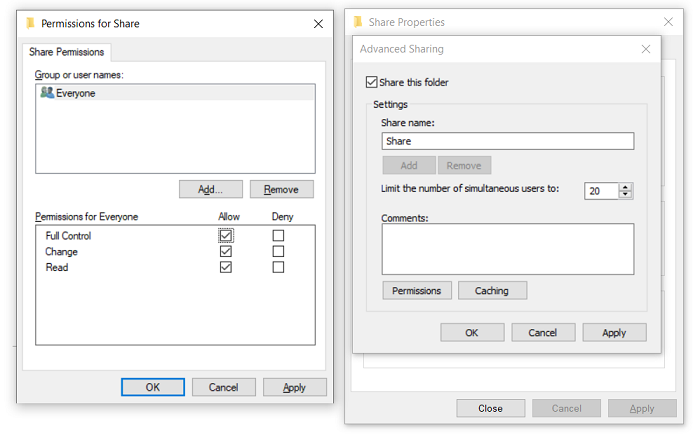
Step 2 Right-click the new folder and choose Properties, then goes to the Sharing tab > Advanced Sharing, and enable Share this folder by ticking the box.
Step 3 Click at Permissions to set them up. Usually, just set up Everyone, and tick the Full Control under Allow.
Now that you have created a shared folder, but how can you let others discover this folder and share files with it? You need to check the IP address of this computer.
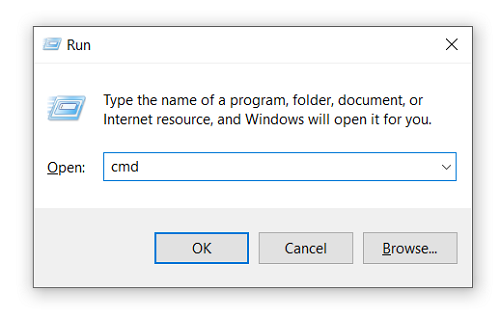
Step 4 Press Windows + R to launch the Run window. Enter “cmd” to open the Command Prompt.
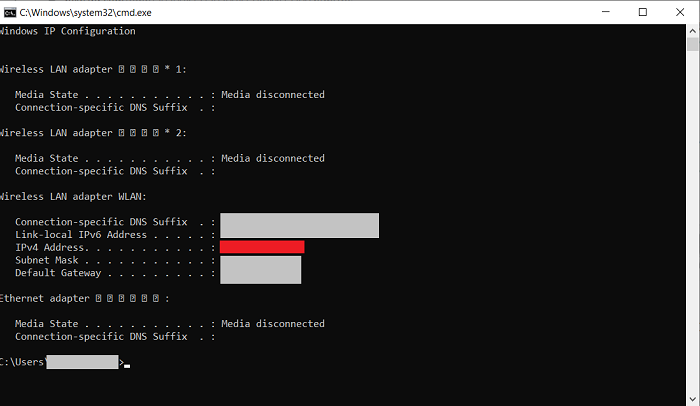
Step 5 Type in “ipconfig” and press Enter, then you will be displayed the Windows IP configuration.

Remember the IPv4 Address (a string of numbers), which you need to use later.
Now it’s your iPhone’s turn to complete the setup.
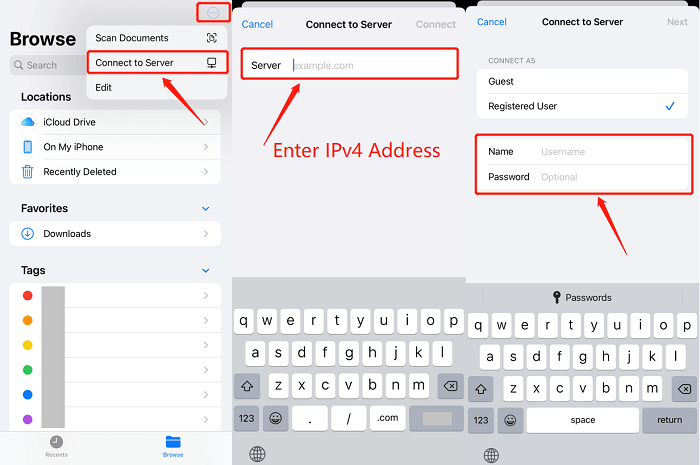
Step 6 Connect your iPhone with the same Internet as your computer. Then, open the Fils app, and tap the three dots icon at the top right, then choose “Connect to Server”.
Step 7 Type in the IPv4 Address you have just remembered. Then under Registered User, you need to enter the Username and Password (what you use to unlock the computer) for this computer.
Step 8 Now you have successfully finished the settings. You will be able to see the shared folder on your PC, and you can freely copy and save the files in the folder in both your iPhone and PC.
Note:
- It might take some time to set up this method, but it’s useful when you want to transfer files from iPhone to PC without iTunes, and vice versa. It’s also quick and smooth, but the drawback is that it must depend on the Internet.
Transfer Files from iPhone to PC with a USB
Supported files: photos, videos
If you just need to transfer a small number of photos and videos from iPhone to your computer, using a USB cable is the most direct way. Regardless of the fact that it only supports transferring photos, and the photos cannot display in a clear category, it’s still convenient.
Step 1 Connect your iPhone to PC with a USB cable. If it’s the first time that you connect this iPhone, you may need to tap “Trust” to authorize the computer access.
Step 2 Open This PC, you will find your Apple iPhone in Devices and drives, double-click to open the device.
Step 3 You will see multiple folders that store your iPhone photos and videos. Usually, they are categorized by date. Open the folders to find the pictures or videos you need, and then drag and drop them to your PC.
Transfer Files from iPhone to PC Without iTunes via Email
Supported files: documents, photos, and other files in small size
If you just want to transfer a small fraction of files on your iPhone to PC, don’t forget there’s a way to use Email. By adding Email attachments, you can simply transfer files from your iPhone to a computer.
Step 1 Launch an Email app on your iPhone.
Step 2 Compose a new Email, enclose it the files you want to transfer as an attachment, and send it to yourself.
Step 3 Log in to your Email account on computer and receive the Email you just sent. Now you will be able to download the attachment files to your PC.
Conclusion
Now you have viewed all the 5 methods for transferring files from iPhone to PC without iTunes. You can use a third-party utility like FonePaw DoTrans, the iCloud Drive, a Shared folder, a USB or an Email.
Each of the methods has their advantages and drawbacks, but as we test, among all the means, FonePaw DoTrans is the quickest and smoothest way with the least limitations. If you want to flexibly transfer your iPhone data at any time, it must be the best choice.