It is easy to delete files on a Mac. But when it comes to recovering deleted files on Mac, especially recovering permanently deleted files from emptied Trash, things become difficult. Still, it is not impossible to retrieve your lost files. This article is going to show 5 ways to help you recover recently or permanently deleted files on MacBook, iMac, and Mac Mini with or without software. You can read on and learn more.
How to Recover Recently Deleted Files from Trash
Trash on Mac supports users to store recently deleted files for 30 days. So Once you discover that some files on your Mac are missing, the first thing you should do is check the Trash.
- Recovery Time: 1 minute
- Difficulty: Easy
- Limitations: Files will be emptied after 30 days.
- Batch Recovery: You can recover as many files as you want at a time.
Steps to Recover Deleted Files from Trash
Step 1. Open Trash from Dock or directly click on its icon on Mac.
Step 2. View the deleted files by size, kind, date added, etc. Or type a keyword in the search bar to find the deleted files that you need.
Step 3. Select and drag the deleted files to any place you like. The files will be restored to their original location. You can also choose Put Back to restore deleted files on Mac.
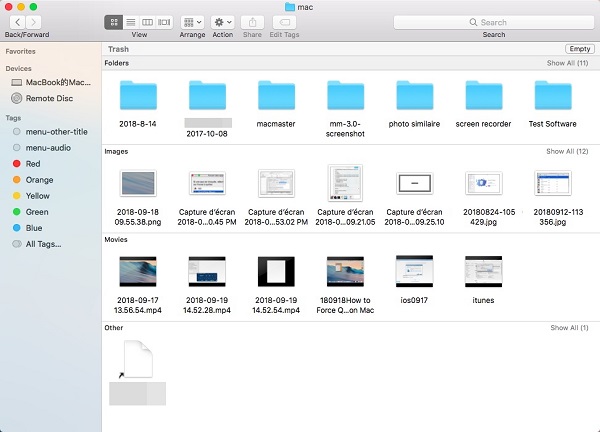
 Remove items from the Trash:
- 1. In the Finder on your Mac, choose “Finder > Preferences”, then click "Advanced".
- 2. Select “Remove items from the Trash after 30 days”.
- 3. For information about restoring deleted items, see the iCloud User Guide.
What Do We Need to Do Before Emptying Trash on Mac
In order to avoid losing some important data files, before you empty the Mac Trash, we recommend:
Tip 1. Check the Trash again.
When you decide to operate emptying the Mac trash can, please double-check that there are no important files in the Trash.
Tip 2.Get in the habit of regularly backing up files.
Save important files to the cloud, external hard drive, or other places for double protection.
Tip 3. Use "Command+Shift+Delete" instead of "Command+Option+Shift+Delete" to delete files.
The previous hotkey will warn you when it is executed, reminding you that you are about to empty the Mac trash bin; while the latter hotkey operation will permanently delete the files in the Trash without any prompt.
How to Recover Emptied Trash on Mac
If you have emptied Trash or bypassed Trash to permanently deleted files via keyboard shortcut, you are not able to find the deleted files on Trash or easily undo your operation. Under this circumstance, the most optimized way is to turn to some third-party recovery tools for help.
FonePaw Data Recovery is highly recommended here because it is an all-in-one solution to recover lost data. As long as your MacBook runs Mac OS X 10.7 or later, the software can deal with common recovery issues. Most importantly, FonePaw Data Recovery supports file preview that is conducive to partial recovery.
Free Download Buy with 20% off Free Download Buy with 20% off
Main Features of FonePaw Data Recovery
- Compatibility: It supports all sorts of drives on laptops and MacBooks.
- Support for various file types: you can recover multiple files including photos, videos, audio, documents, and so forth.
- Ease of use: preview files before recovery and offers a batch recovery feature to save your time.
- High recovery rate: It carries two scan modes to quickly or deeply restore your files. With the two modes, the majority of files can be retrieved.
Full Tutorials on Recover Emptied Trash on Mac
- Recovery Time: Less than 10 minutes
- Difficulty: Easy
- Limitations: The quick scan mode can't recover files that have been overwritten by new data.
- Batch Recovery: You can recover multiple files at a time.
Step 1. Download FonePaw Data Recovery and launch it.
If you need to recover deleted files from a Mac computer and see a message like "Startup disk is protected by 'System Integrity Protection' on your Mac. Please disable it for data recovery completely," you need to disable System Integrity Protection on your Mac before using the software. Since the deleted data are saved in the system files that are protected by System Integrity Protection, FonePaw Mac Data Recovery cannot find the deleted files when System Integrity Protection is on.
Free Download Buy with 20% off Free Download Buy with 20% off
Step 2. Select the Files that You Want to Recover
Tick photos, videos, documents, or other kinds of files you want to retrieve from Mac. Then select the drive that used to contain the deleted files.
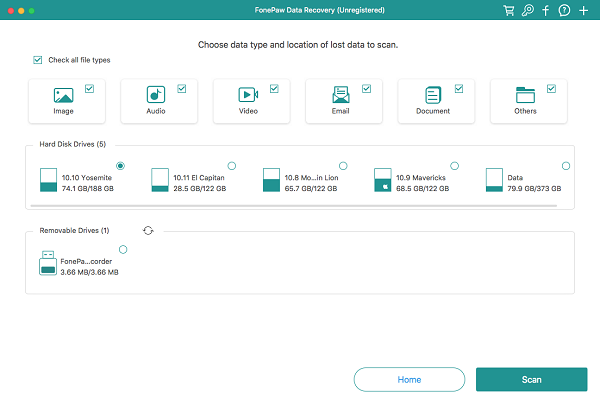
 Tip:
Tip:- If you need to recover deleted files from an SD card, USB drive, etc. on Mac, connect the storage device to Mac and select it in Removable Drive.
Step 3. Click Scan for the Application to Find Deleted Files on Your Mac
The application provides two modes of file recovery: Quick Scan and Deep Scan. Quick Scan can recover files that are deleted recently while Deep Scan can find out all deleted files on a Mac. So Deep Scan will take a quite long time, from several hours to even one day, depending on the storage size of your hard drive.
I suggest that you can use the Quick Scan first, if you can't find the deleted files you need, then use the Deep Scan. After starting the Deep Scan, you can just do other things and let your computer complete the scan by itself, waiting for a while and then coming back to check the results.
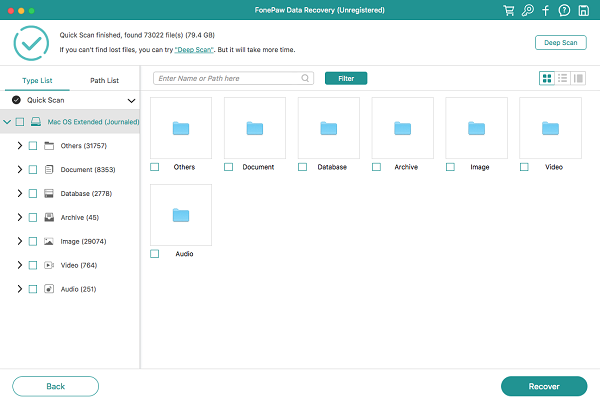
Step 4. Restore Deleted Files Successfully on Mac
During the scanning, you can view the found files by type or path. Once you see the deleted files that you need, pause the Deep Scan, select the files and click Recover to get them back to your Mac.
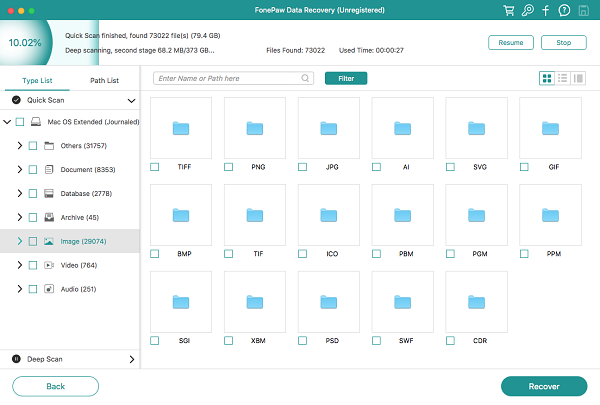
 Note:
Note:- Files marked in orange are files that have been deleted.
How to Retrieve Deleted Files with Undo Option
If you accidentally deleted some important files a few seconds ago and want to retrieve them back, you can adopt Undo option instead of searching name in Trash. But you need to do it immediately after removing the files.
- Recovery Time: A few seconds
- Difficulty: Easy
- Limitations: It doesn't work when you have taken many other operations.
- Batch Recovery: This way can only undelete the latest deleted file.
Step 1. After deleting files, find "Edit".
Step 2. In the drop-down menu, click the "Undo Move" option.
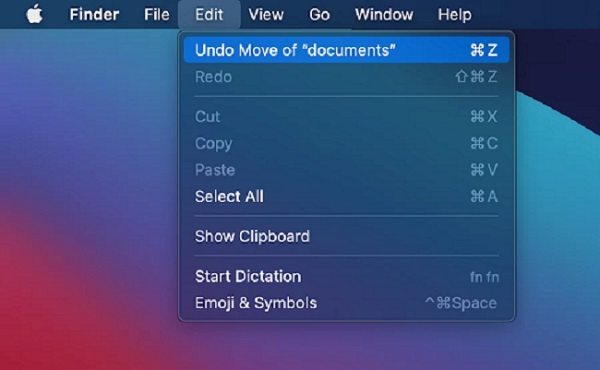
Alternatively, you can press "Command + Z" on your keyboard to undo the delete operation.
How to Recover Deleted Files via Time Machine
Time Machine application is Apple's backup solution for Mac. To leverage this feature, you need to enable Time Machine to back up your data first, and then you can recover deleted files on Mac. Remember this solution is useless if you don't back up your files before.
Recover Deleted Files via Time Machine
- Recovery Time: about 10 minutes
- Difficulty: Intermediate
- Limitations: Backup and original location are required.
- Batch Recovery: It is possible to recover multiple deleted files at the same time.
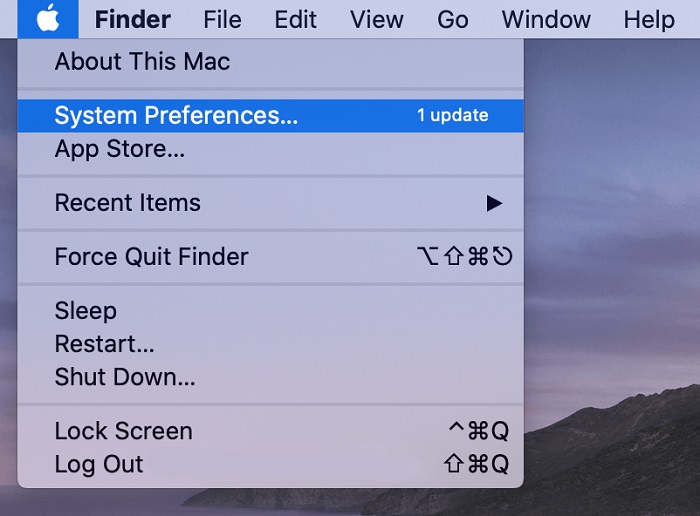
Step 1. Launch Time Machine on your Mac. You can access it via System Preferences > Time Machine or using Spotlight Search.
Step 2. Use the timeline on the right edge of the screen to find the most recent version of your deleted files.
Step 3. Select the files and click Restore, and you can find the files in the original location.

Ways to Back Up Files via Time Machine
If you are interested in recovering files via Time Machine, you can follow the next steps to learn how to back up files via Time Machine.
 Note:
Note:- It's recommended that you back up your files to a location other than your internal disk, such as an external hard disk. Because you can restore your entire system to another Mac if anything ever happens to your internal disk or to your Mac.
Step 1. Connect an external storage device to your MacBook.
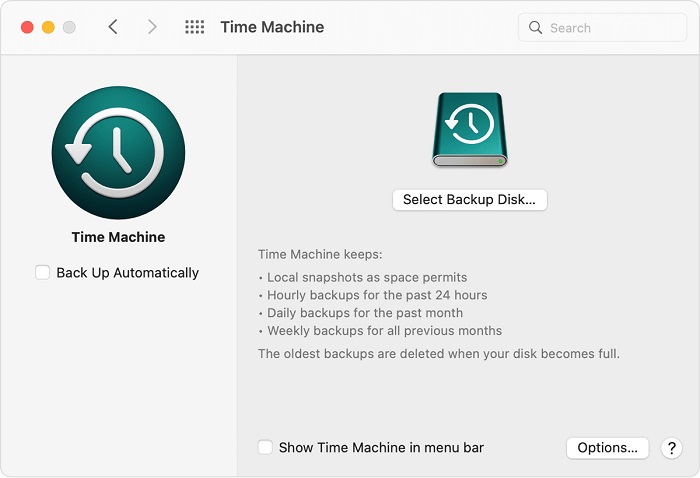
Step 2. Open Time Machine preferences from the Time Machine menu in the menu bar. Or choose Apple menu > System Preferences, then click Time Machine.
Step 3. Click Select Backup Disk.
Step 4. Select the name of your disk, then click Use Disk. Time Machine immediately begins making periodic backups automatically
How to Restore Deleted Files Using Mac Terminal
Terminal is an application that enables users to complete different tasks on Mac with the Unix command line. Some users wonder if there is a command-line that can recover deleted Mac files via Terminal. Yes, there is a command-line to recover deleted files, but only from Trash. Therefore, if the deleted files are emptied from Trash, there is no command line to recover the emptied trash.
- Recovery Time: 3-5 minutes
- Difficulty: Hard
- Limitations: The correct names of the deleted files are required.
- Batch Recovery: One file every time is possible.
To restore deleted files via Terminal, follow these steps:
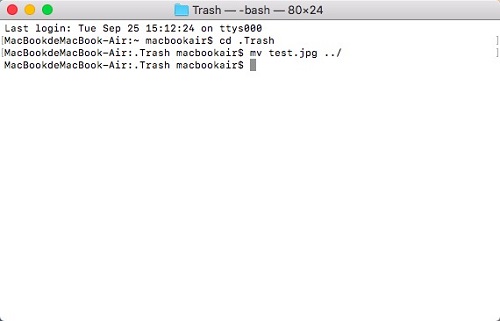
Step 1. Open Terminal. You will see the command-line interface.
Step 2. Type cd .Trash. Hit Enter.
Step 3. Type mv xxx ../. Replace the xxx part with the name of the deleted file. Hit Enter.
Step 4. Open Finder and in the search bar, enter the name of the deleted file and hit Enter. The deleted file will appear.
Wrap-up
When you realize that you have deleted files that you need, you should first check Trash to see if the files are restorable. If you want to recover the latest deleted files immediately, Undo option is recommended. If you get used to backing up files, you can use Time Machine to get them back. If not, your only chance to get back the deleted files is using Mac files recovery software - FonePaw Data Recovery. To make sure the deleted files won’t be overwritten by new files, do not use the Mac to create or download new files.
Free Download Buy with 20% off Free Download Buy with 20% off


