"How to transfer photos from computer to iPhone? I used to import photos from PC to iPhone 7 with iTunes. But it turns out that some of the useful pictures or other data get deleted and I cannot be able to get them back on my computer. So what should I do?"
Almost every digital camera in the business is equipped with a transfer utility for users to get pictures onto a computer. For iPhone users, iTunes is one of the options. However, some new iPhone users may find that iTunes is not so easy to manage their device, especially when they try to transfer photos from computer to iPhone. They need to pay attention to the transferring process since it might delete the existing pictures on their iPhone.
Here in this article, I want to show you the ways about how to import photos from computer to iPhone with or without iTunes. If the limits of importing photos from PC/Mac computer to iPhone with iTunes will not do any adverse impact on you, you can, of course, use iTunes to transfer photos between PC and iPhone, otherwise, you are recommended to use a professional transferring tool to move photos from computer to an iPhone. Want to see more details, just scroll down and check!
Tips: Want to learn how to transfer pictures between iPhones? See also: How to Transfer Photos from iPhone to iPhone (opens new window)
Solution 1: Transfer Photos from PC to iPhone without iTunes
In order to have better access to your iPhone data and avoid erasing data when using iTunes to sync your iPhone, you can count on FonePaw DoTrans (opens new window), which enables you to transfer photos from PC to iPhone X/8/7/6S/6 or transfer photos from iPhone to computer (opens new window), for example, if you want to transfer photos from iPhone to Windows 10. Below I will show you the step-by-step guide to transferring photos from computer to iPhone without iTunes.
Now you can get the trial version of FonePaw DoTrans and start to copy photos from the computer to iPhone.
Note: During the 30 days' free trial period, you can copy unlimited photos from PC to iPhone for free.
Free Download Buy with 20% off
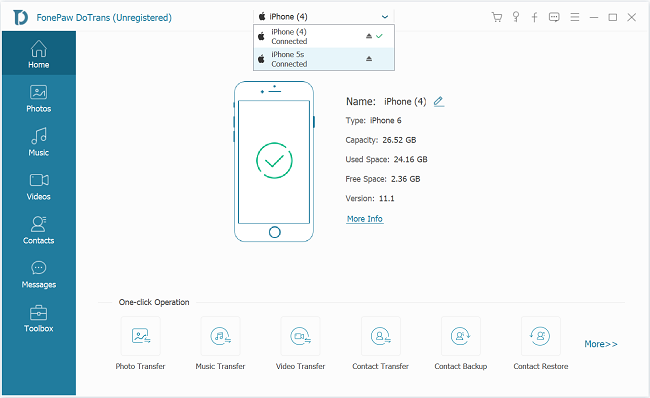
1. Launch FonePaw DoTrans and Connect iPhone to PC
To start with, install and run FonePaw DoTrans on your computer and plug iPhone. Then you can see the interface as below.
2. Transfer Photos from PC to iPhone
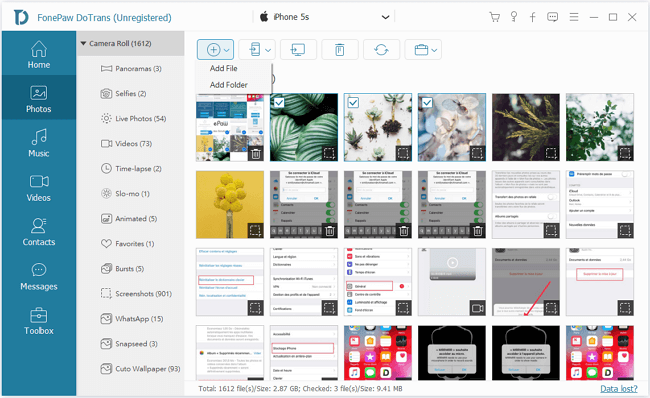
At the left side pane, choose "Photos" and pick the album you want to sync images, then click "Add" to transfer photos from PC to iPhone. Here you can move some photos to existing albums or create a new album through FonePaw DoTrans. You can also put an album to iPhone as a whole. In this way, you are able to download photos from computer to iPhone!
See also: Quick Ways to Move Everything from Old iPhone to New iPhone 8/X (opens new window)
YouTube Video Tutorial: How to Transfer Photos from PC to iPhone
Solution 2: Sync Pictures from Computer to iPhone Using iTunes
If it is totally fine for you to transfer photos from computer to iPhone with iTunes, you can follow the below steps to sync photos from computer to iPhone/iPad.
1. Preparation
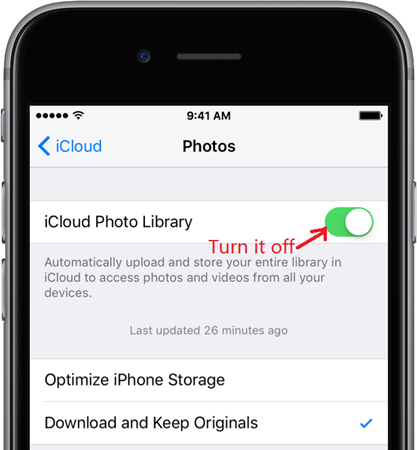
iTunes couldn't sync photos to iPhone if "iCloud Photo Library" on the iPhone is functioning. Therefore, make sure that iCloud Photo Library is off on your iPhone: go to "Settings" on iPhone > get access to "iCloud" and find "Photos" > turn off "iCloud Photo Library".
2. Get the Synchronization Started
Open iTunes on computer and connect the computer with your iPhone by USB cable. After successfully connected, the iPhone’s icon will appear under the Play button in iTunes window and click the icon. After entering your iPhone, choose "Photos" under the "Setting" list.
3. Syncing Photos to iPhone
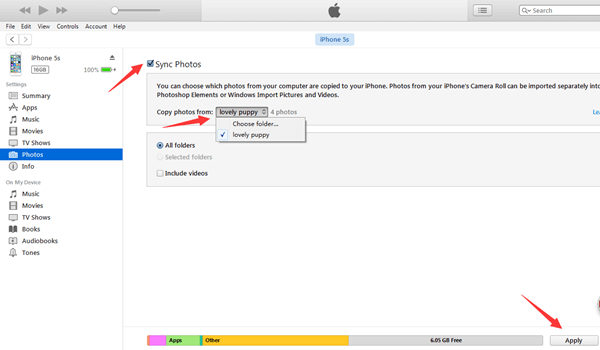
After choosing "Photos", tick "Sync Photos" in the main pane. Then choose photos that you want to have on iPhone by pressing "Choose Folder" button. Through the pop-up window, select a folder that contains photos you want. If the folder that you selected contains more than one folder, you can copy either photo in all folders by choosing "All folders" or photos from some folders by choosing "Selected folders" and ticking the folders. After you have selected the right photos, click "Apply" and iTunes will begin to transfer photos from PC to your iPhone.
4. One Thing You Should Know about Syncing Photos with iTunes
Syncing photos to iPhone by iTunes sure is easy and handy. But the problem is: after photos are synced from computer to your iPhone this time, photos that previously were synced to your iPhone from other photos library or folders will be removed from your phone. If you don't want to take the risk of losing the photos that are currently on your iPhone, use DoTrans to drag and drop photos from PC to iPhone (opens new window).
Solution 3: Sync Pictures from Computer to iPhone Using iCloud
If you've enabled iCloud Photo Library (opens new window) on your iPhone, you can sync pictures between iPhone and iCloud. To transfer photos from computer to iPhone, you can upload photos to icloud.com and they will be synced to your iPhone when it is connected to Wi-Fi. You should make sure you've signed up the same iCloud account on the computer and iPhone.
Follow the steps to transfer photos with iCloud.
1. Enable iCloud Photo Library
On your iPhone, go to Settings > Your Name > iCloud > Photos > Turn on iCloud Photo Library.
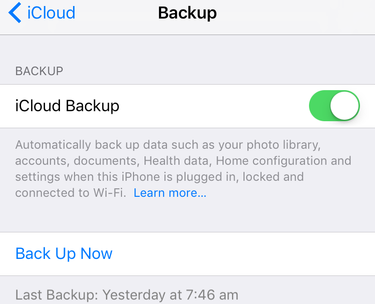
On your computer, go to iCloud.com > log in with your Apple ID.
2. Upload photos from computer to iCloud
On your computer, go to Photos and click the Upload button. Select the photos you need and add to iCloud. Open your iPhone Photos, when the Wi-Fi is available, photos will be synced to your phone.

Notice:
iCloud will sync pictures to iPhone, iPad, Mac, Apple TV, and Apple Watch that signing up with the same Apple ID.
iCloud only provide 5GB free storage. When you run out of space, you will need to pay for extra iCloud storage.
Solution 4: Sync Pictures from Computer to iPhone Using OneDrive
OneDrive is operated by Microsoft, but you can install the OneDrive app on both of your computers and iPhone to transfer pictures. It only takes two steps to send photos from the computer to the iPhone.
1. Install the OneDrive app on your computer and iPhone
Meanwhile, sign in with your Microsoft account.
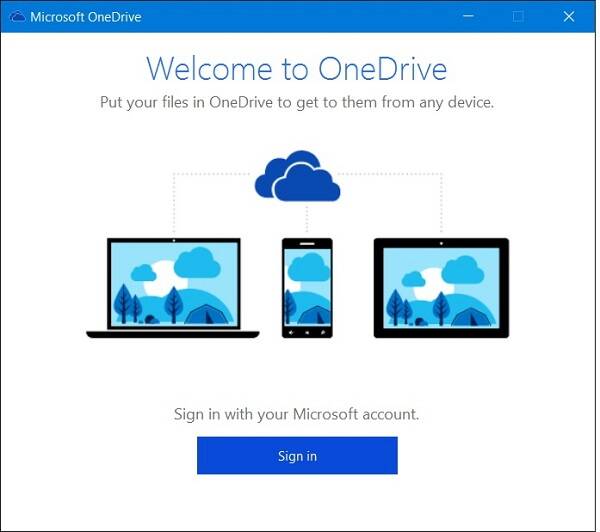
2. Drag the files or entire albums to the OneDrive file folder
A few seconds later, you will see them on your iPhone in the OneDrive app.

Notice:
OneDrive app does not support for HEIC photos. Thus, you cannot view or copy them to the Photos app.
Photos will be synced to the OneDrive app instead of the Photos app on your phone. To add photos directly to iPhone photos library from PC (opens new window), use FonePaw DoTrans.
Solution 5: Sync Pictures from Computer to iPhone Using Google Photos
Just like iCloud and OneDrive, Google Photos is another convenient drive service for you to transfer pictures from computer to iPhone or vice versa. The steps of syncing photos with Google Photos are simple.
1. Sign in with your Google account
On your computer, go to https://photos.google.com/ and create a new album.
On your iPhone, go to the App Store and install Google Photos. Login with the same account on your computer.
2. Upload photos from computer to Google Photos
On your computer, choose photos you need and upload it to Google Photos. Then the photos will be synced to the Google Photos on your iPhone.

Nicely done! Transferring photos from PC to iPhone is a piece of cake by following the above steps. Thus far, FonePaw DoTrans supports all of the iPhone models such as iPhone X/8/7 and other older versions. If you also use iPad, you can sync photos to iPad or move photos from iPad to PC with FonePaw DoTrans as well. Just download the program and have a try to export photos from Windows to iPhone.


