This post is a full guide to transferring music from computer to iPhone with/without iTunes. If frustrating problems occur while transferring with iTunes, try some fixes in FAQ or just try FonePaw iOS Transfer to import your songs to iPhone quickly and easily.
Free Download Buy with 20% off Free Download Buy with 20% off
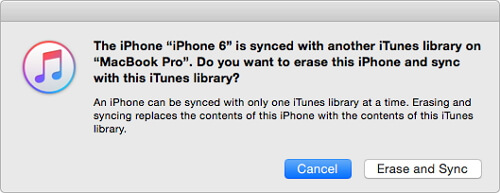
Just downloaded some wonderful songs on your computer and want to add it to your iPhone for listening on-the-go? The next thing you do should be transfer the music from computer to iPhone. Usually, it’s not a complex task, but can be confusing and sometimes frustrating when you use iTunes and encounter some unexpected problems, like a pop-up window below (which we will talk about later).
In this article, we will show you how to transfer music from your PC to iPhone with/ without iTunes and answer some frequently asked questions about transferring music to iPhone. Read on if you have any confusion about it.
How to Transfer Music from Computer to iPhone Without iTunes
When you transfer music to your iPhone via iTunes, and find it really time-consuming or just cannot work, you may want to replace iTunes with another tool to do the transferring job. Actually, it’s a good idea. Instead of being stuck in an annoying situation, it’s great to try putting your music on iPhone with a third-party tool.
FonePaw iOS Transfer is a good iTunes alternative. This software can help you transfer music from PC to iPhone 13/12/11/XS/X/8/7/6s/6 without erasing the existing songs. You can also use the program to view the detailed music info, and edit all ID3 tags for each song. Moreover, you are allowed to create new playlists while adding music so that you can easily preserve and manage the customized playlists on your computer and iPhone.
If you want a quick reminder, then follow the tutorial in this page to see how to copy music to iPhone.
Step 1. Download FonePaw iOS Transfer
Free Download Buy with 20% off Free Download Buy with 20% off
Step 2. Launch iOS Transfer and connect iPhone to computer
Launch the program after installing. Then, connect your iPhone to the computer via USB cable. A moment later, you can see your iPhone appear in the main window.
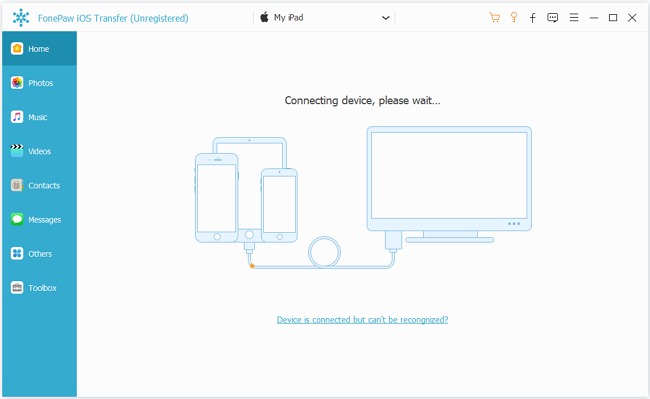
Tips: When click "More Info", this program show you iPhone info like model, capacity, version, format and serial number, etc.

Step 3. Transfer music from computer to iPhone
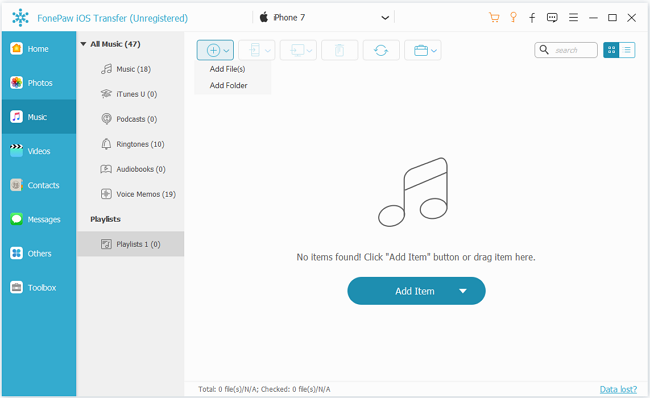
Click "Music" in the left sidebar. Then, click ![]() and select Add File or Add Folder. Select the songs from your computer and click Open. iOS Transfer will transfer songs to your iPhone.
and select Add File or Add Folder. Select the songs from your computer and click Open. iOS Transfer will transfer songs to your iPhone.
The progress will last a few seconds. After you download music from computer to iPhone, you can listen to the new added songs on your iPhone.
Not only transferring music from computer to iPhone, FonePaw iOS Transfer can be your best music manager whether you want to transfer music or more Apple files from PC to iPhone, from iPhone to PC, or even iPhone to iTunes. Furthermore, this software can backup iPhone Contact, Music, Playlist, Movie, Photo, EPUB, PDF, Audiobooks, Voice Memo, Ringtone, Podcast, TV Show, SMS, etc, which leaves you no worry when losing data.
How to Add Music from Computer to iPhone with iTunes
Although there are downsides, transferring music to iPhone with iTunes is still a mainstream method. You may fail to put the music on your iPhone just because you are not familiar with iTunes. Here we will also provide a step-by-step guide for you to sync music from iTunes to iPhone 13/12/11/XS/X/8/7/6s/6.
Step 1. Add songs to iTunes from computer
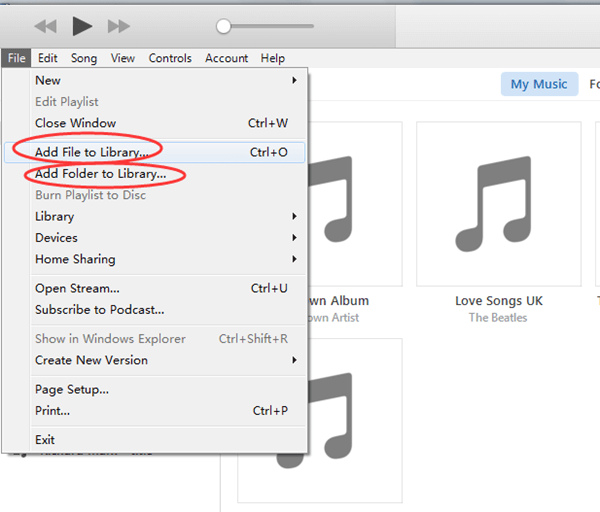
Open iTunes on your computer and click the "File" button on the top left corner of the interface, then you can choose "Add File to Library" or "Add Folder to Library". The former allows you to add music files to iTunes one by one while the latter will add all song files in a folder to iTunes at one time.
Step 2. Transfer songs from computer to your iPhone with iTunes
After connecting your iPhone to computer with its USB cable, you'll find a cell phone icon besides content menu on the top. Click the cell phone icon and choose "Music" in the "Settings" menu.
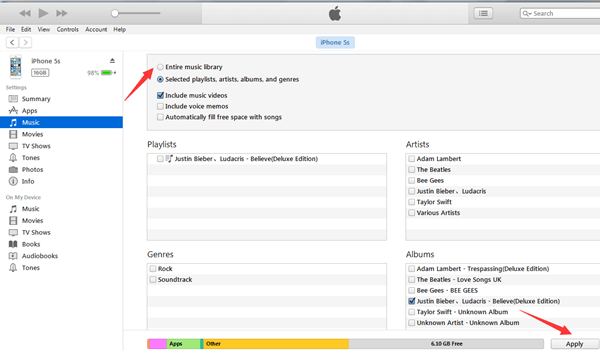
Then tick "Sync Music" so that you can choose either "Entire music library" or "Selected playlists, artists, albums, and genres". If choosing "Entire music library", click "Apply" in the bottom right corner, then all songs in iTunes music library will be transferred to your iPhone.
If you prefer to sync some of songs in iTunes music library to iPhone, choose "Selected playlists, artists, albums, and genres" and all songs in the music library will be listed, from which you select songs that you would like to have in your iPhone. After you have chosen the right songs, click "Apply" and wait a few seconds for the synchronization to complete. This is how to transfer music from PC to iPhone using iTunes so you can enjoy songs now.
Tips: If you want to transfer music to iPhone using iTunes but without syncing, you can go to Summary > Manually Manage Music and Videos to apply the manually transfer feature, and then go back to Library, choose and right-click the songs to add to your iPhone device (drag the songs and drop at Your Device > Music section is also available).
FAQ: Problems that May Occur When Transferring Music with iTunes
Here we collect some common problems when you try to import songs to your iPhone with iTunes. Have a check if you need it.
Q1: Why am I asked “Do you want to erase this iPhone and sync with this iTunes Library?”
This warning comes up stating that all existing music will be erased on your iPhone because you are using a new computer to sync music from iTunes Library to iPhone. Don't be too worry. The “erase this iPhone” just means that all the data synced with the last iTunes will be wiped from your iPhone, for example, the songs, videos, etc. The other settings of your iPhone like Contracts will not be affected.
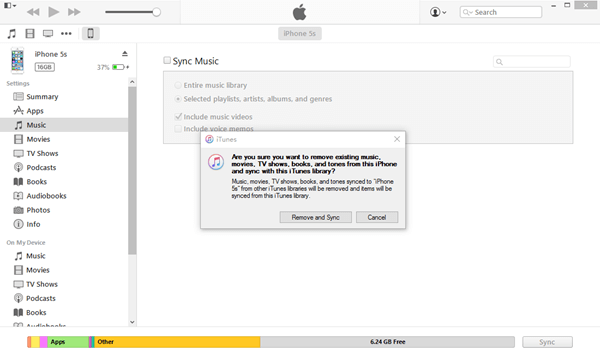
This isn't a big deal if your new iTunes Library also contains your old music, because these files will sync back to the iPhone. However, if you have deleted your old music from your library or are attempting to add music from another computer, you'll lose the old files.
Therefore, one way is to sync your phone with the new library and then download back the files in the old library. Or, you can try to manually add the songs to your iPhone without syncing. But to avoid data loss and make it easy, the most recommendation is to use a third-party tool and transfer music to your iPhone without iTunes.
Q2: Why some of the songs cannot be added to iTunes?
Problems like that may also happen when you are going to transfer some music files that Apple devices don’t support with iTunes. Although iTunes can help you convert some unsupported formats, for example, WMA to MP3/AAC, there are still restrictions, like the DRM protected songs.
In order to add the music to iTunes and transfer it to iPhone successfully, you can try to convert the music format first. If you want to skip the converting process, we also recommend you try FonePaw iOS Transfer, which can automatically convert the unsupported formats.
Q3: Why is iTunes not syncing with iPhone?
This transferring problem can be caused by several reasons. We recommend you to update your iTunes to the latest version first, and check whether your iTunes and iPhone have signed in to the same Apple account.
Besides, if you have subscribed to Apple Music and applied iCloud Library, it’s probably the reason. Try to turn off “iCloud Music Library” or “Sync Library” on your iPhone and iTunes, and then sync the songs again.
If what mentioned above doesn’t work, try to transfer songs from iTunes to iPhone manually, or use FonePaw iOS Transfer to help.
That’s all you need to know about transferring music from computer to iPhone with or without iTunes. Using iTunes to transfer is not difficult if everything is ok. If you encounter some problems or want the transfer to go easily and quickly, iOS Transfer can be your first choice. Feel free to reach us if you have any concerns.
Free Download Buy with 20% off Free Download Buy with 20% off


