How can I import the movies I have saved in my Mac into my iPhone? How can I transfer the photos I have processed in my MacBook Air/Pro to my iPhone? Many Apple users may have questions like these.
As Mac and iPhone both belong to the Apple ecosystem, Apple provides multiple ways for users to easily transfer files between iPhone and Mac. You can move photos from Mac to iPhone using a USB cable, or if you don't have a cable in hand, transfer files wirelessly between iPhone and Mac is also possible.
Here I have picked the 3 most simplest methods to transfer Mac files to iPhone for your reference.
1.Transfer Files from Mac to iPhone without iTunes
iTunes comes with your Mac to manage contents of connected iOS devices. Although we can transfer files from Mac to iPhone with iTunes, it is confusing sometimes since iTunes might erase some of the iPhone contents to keep the iPhone syncing with the iTunes library.
That's why many users are looking for a more straightforward way to move files between Mac and iPhone. FonePaw iOS Transfer (opens new window) is a decent choice. It supports all types of files such as photos, videos, audios, PDF files and even your contacts and messages to be transferred from Mac to iPhone. Also, unlike iTunes, which doesn't support importing iPhone files to Mac, FonePaw iOS Transfer allows you to put files from iPhone to Mac computer (opens new window) too. You can follow the below instructions to moving your files freely.
Step 1: Download the installation package and install it on your iMac or MacBook.
Free Download Buy with 20% off Free Download Buy with 20% off
Step 2: Use a lightning cable to connect your Mac and iPhone.
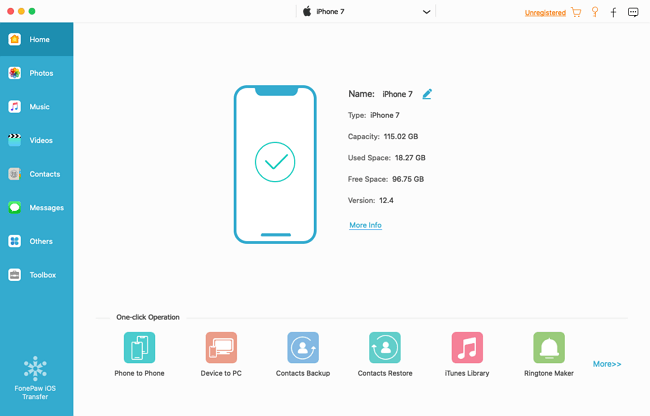
Step 3: Launch FonePaw iOS Transfer and you can see your iPhone is recognized by the tool.

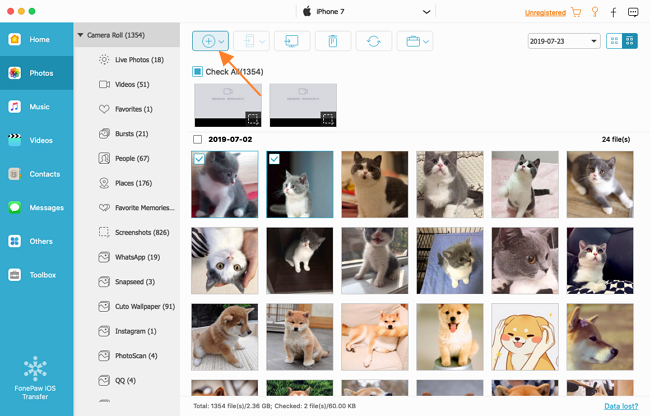
Step 4: On the left panel, select the data type you want to transfer and click "Add". Then you just choose the files you want to transfer on your MacBook to iPhone.

Note: You can also put files from your iPhone to MacBook by using the "Export" feature.
With the user-friendly interface, FonePaw iOS Transfer makes it easy for any user to start data transfer between Mac and iPhone without question. In addition, you can also use it to transfer files between your Apple mobile devices such as iPad, iPod Touch and iPhone.
2. Files Sharing from Mac to iPhone with iTunes
As I have said, you can also use iTunes for file transfer from Mac to iPhone. If you need to transfer Word or Excel files, the file sharing feature in iTunes will be especially useful for you.
Step 1: Open iTunes on your MacBook or iMac and connect your iDevice such as iPad, iPhone and iPod Touch to it.
Step 2: Click your devices in iTunes and its icon is normally located on the navigation bar.
Step 3: Click on File Sharing on the left sidebar; Then you can see the apps (file-sharing apps), such as KeyNotes and Pages, whose files can be shared within your Apple devices. You can only transfer the files belonging to a certain file-sharing app.
Step 4: Highlight a file-sharing app by clicking it and you can then drag or drop files onto the corresponding file-sharing app in iTunes. Or you click "Add" on the Document list in iTunes and then find the file in your MacBook after selecting a file-sharing app.
3. AirDrop Files from Mac to iPhone
The last method I am going to introduce is to use AirDrop which requires no cable to connect your iPhone with Mac. In other words, your files are transferred wirelessly. Here is how to use it:
Step 1: Turn on AirDrop on both your MacBook and iPhone. and please make sure you have selected the option: Everyone.
Step 2: Go to Finder > AirDrop on your MacBook and you can see your iPhone's name on the right window.
Step 3: Drag and drop any file you want to transfer onto the iPhone's name. (Or find the file in your MacBook first and then choose Share > AirDrop; Choose your iPhone's name). Then choose an app to open the file on your iPhone.
The above methods respectively have their own advantages and limitations. You can choose the best one based on your need.


