Live streaming has been supported on various social media nowadays and you can see tons of them in every category. Some live streamers save their streams and upload them so that you can watch them after it's over. What if they don't? You will need to record them in real-time. This post is going to show you how to record a live stream quickly and easily – no matter if it's on YouTube, Facebook or even a meeting platform such as zoom and webinar.
How to Record Live Streaming Video? What Do You Need for That?
To record a live video on your computer, you will need to launch a recording application, select the recording area and audio. Then record the live streaming and save it to your PC.
# What You Need to Know/Do Before Recording
If you are to record a live stream on YouTube or Facebook, here are some details of the recording settings for you. The actual length of the live stream depends on the streamer and it's recommended to choose the ratio 16:9 unless the streamer is live streaming on the phone with the ratio of 9:16.
| Details of Live Streaming on Facebook/YouTube | |||||
| Maximum Resolution | Minimum Resolution | Maximum Video Length | Display Ratio | Recommended Video Output Formats | |
| 1920×1080 | 1280×720 | 90min | 16:9, 9:16, 2:3, 4:5, 1:1 |
MP4, MOV | |
| YouTube | 3840 x 2160 | 426 x 240 | 12h | 16:9 | MP4, MOV |
Set your computer screen resolution for HD live streaming recording. You can find the setting options through the path below and choose the resolution you need.
- Windows: Settings > System > Display > (on the right pane) Resolution
- macOS: Apple Menu > System Preferences > Display > Gather Windows > Resolution: Scaled
Set the sleep time of your computer. To make sure that you record a full-length live stream, you'd better set your computer and display as never sleep. Here is the path for each OS:
- Windows: Settings > System > Power & sleep
- macOS: Apple Menu > System Preferences > Energy Saver
# What You Need to Record a Live Video:
- A computer (Windows/Mac)
- A live streaming page (whether the live stream is past or about to start)
- FonePaw Screen Recorder
Free Download Buy with 20% off Free Download Buy with 20% off
Record Live Stream with Professional Software
There are numerous recording tools on the internet and it is tiring to test each of them for the best one. But you will find that FonePaw Screen Recorder (opens new window) meets your needs and never disappoints you.
# Why FonePaw Screen Recorder Is the Best Live Steam Recorder?
As a piece of professional software, this live-stream recorder provides an easy-to-understand and intuitive interface and a smooth user experience with stable performance. What makes it one of the best screen recorders is its versatility that allows you to record all kinds of live streams such as YouTube lives, Facebook lives, online meetings, TV shows on your pc. Here are some of its essential features.
- Record live streaming videos with audio without lag (opens new window)
- Set task schedule (auto start-stop)
- Select a specific window with a customized region to record
- Capture screenshots
- Record live streams or your face with high quality
- Add annotations when recording
- Restore unsaved recording
# Start to Record Live Video Now
Step 1 Select a recording area and the audio
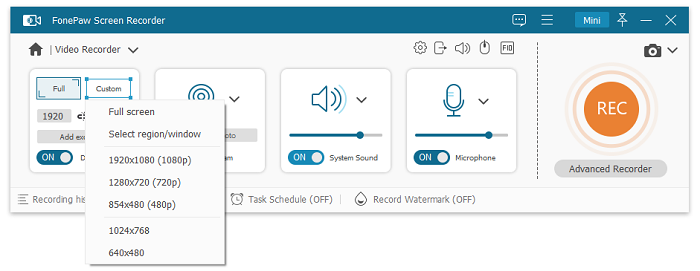
After your launch FonePaw Screen Recovery, hit Video Reorder on it. Then select the recording region. You can record the full screen or drag it for a small size.
Under the Orange recording button, you will see the Advanced Recorder. Here you can exclude other windows to avoid live-stream recording covering up.
In order to record a live stream with a clear sound, don’t forget to toggle on the System Sound and off the Microphone.
Free Download Buy with 20% off Free Download Buy with 20% off

Step 2 Adjust the video output setting for the live stream
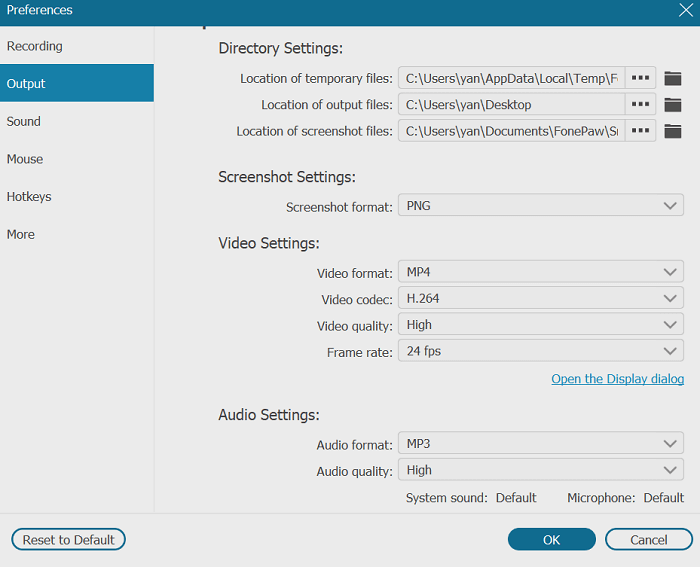
Click the gear icon and you will see the preference settings. In the tab Output, you can change the output format to MP4, codec to HEVC/H.265, quality to lossless, and frame rate to 60 fps for a perfect live streaming recording.

Step 3 Start to record a live stream and preview
Once you finish the settings, you can start to record the live stream by clicking the orange button. You can add some annotations on the screen while recording by drawing or typing words. After you finish the recording, this software allows you to preview or trim the recorded live stream before you save it to your computer.
- Tip for live streams that have started or over
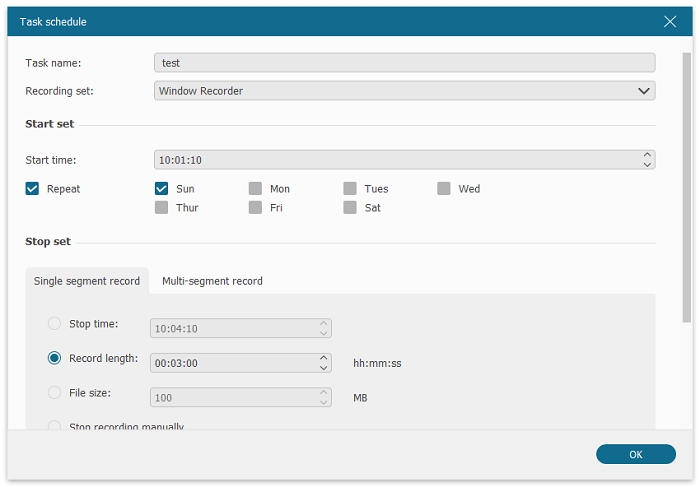
If you are not available to watch while recording and stop it when the live stream is over, you can set a record length by clicking the clock on the floating bar.
- Tip for those that haven't started
There is a task schedule at the bottom of the video recorder interface. With this function, you can set a recording schedule and FonePaw Screen Recorder will start and stop recording automatically.

 Note:
Note:- Keep your laptop charging when recording the live stream, especially when you are using the task schedule. But even though your pc suddenly shuts down during the recording, this software gives you the chance to restore it when you launch it the next time.
FAQ About Recording Live Video on PC
# Can I Record Facecam When I'm Live Steaming?
Yes. With FonePaw Screen Recorder, you can record your face and the live streaming at the same time (opens new window), no matter if you are the live streamer or the viewer. All you need to do is turn on the Webcam switch before you start to record, then you can stream and record at the same time.
# Is It Possible to Record Live Videos Without Downloading Software?
Yes, it is. But only Windows 10 and macOS have their own built-in recording tool. The one for Windows 10 is called X-box and that for macOS is QuickTime player (opens new window).
However, X-box can only record one particular window and will stop recording by itself if you close or minimize the window that you are recording. And QuickTime player cannot record the system sound and the microphone sound simultaneously. Worse, you need to install an extension for system sound recording with this tool.
Here is a simple guide:
-
Windows: Open the window that is to record, press Win+G and then adjust the recording audio. Then tap Win+Alt+R to start/stop.
-
macOS: Press Shift+Command+5. And select a recording region and the audio source from the Options. Then hit Record.
Besides, you can also use some online Chrome recorders to record live streams without downloading the desktop software.
Final Words
FonePaw Screen Recorder (opens new window) is never a wrong choice when it comes to recording live streams, games, meetings, tutorials, or other actions on your screen. Not only can it record your screen and audio at the same time, but also it can record only the audio or the Webcam. With versatile functions and preferences settings, you will enjoy it so much when using it.
Free Download Buy with 20% off Free Download Buy with 20% off


