Computer crash and power failure occur frequently and unexpectedly. If you happen to be working hard on an Excel workbook but forget to save it in time when Excel stops working; or if you accidentally close the file without saving it, it would be a big tragedy. But, thankfully, Microsoft Excel has built-in AutoSave and AutoRecover features which can help you avoid losing important data. Follow us to see how these features recover unsaved excel files on Excel 2016/2013/2011/2007/2003.
We will also introduce a professional data recovery that can help you out when Excel's built-in features fail to work recover excel files that are not saved. A good habit of saving Excel files on time and preparing a backup copy will also work to your advantage.
Free Download Buy with 20% off Free Download Buy with 20% off
Recover Unsaved Excel Files via AutoRecover
Microsoft Excel now has a built-in AutoRecover feature which can help users retrieve the files if Excel closes unexpectedly due to power failure or computer crash. It can restore the unsaved file to the last saved version. When Excel closes unexpectedly without saving your work, don't worry. Next time you run Excel, you can see the retrieved file in the Document Recovery pane.
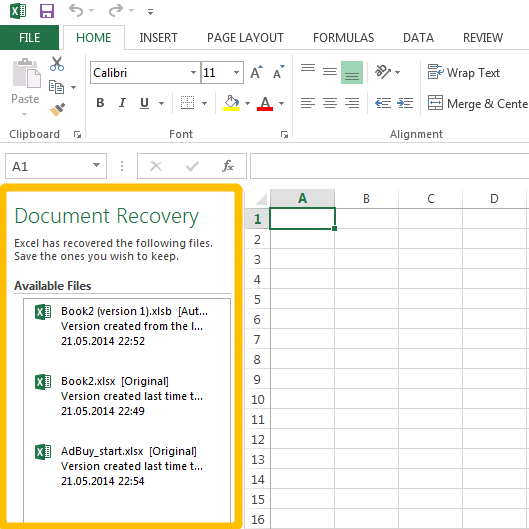
But it should be noted that Excel AutoRecover is not workable unless you have saved the file at least once. If you have never saved the file before Excel accidentally stops working, the file will not be recovered.
Locate and Recover Unsaved Excel Files via AutoSave Folder
With AutoSave, another built-in feature of Microsoft Excel, a newly created excel file can be saved automatically in a preset interval. Even if users forget to save the file, they will not totally lose it when something goes wrong.
Like AutoRecover, AutoSave is turned on by default in Excel, and it also allows users to define the interval of auto saving and the location of the saved excel file. Once you close Excel documents without saving, the first thing that you should do when reopen Excel is to recover unsaved Excel files from AutoSave folder where the temporary excel files are stored.
To reach the auto-saved Excel files, do as the following steps:
Step 1: Click File > Open > Recent Workbooks.
Step 2: Go to the Recover Unsaved Workbooks.
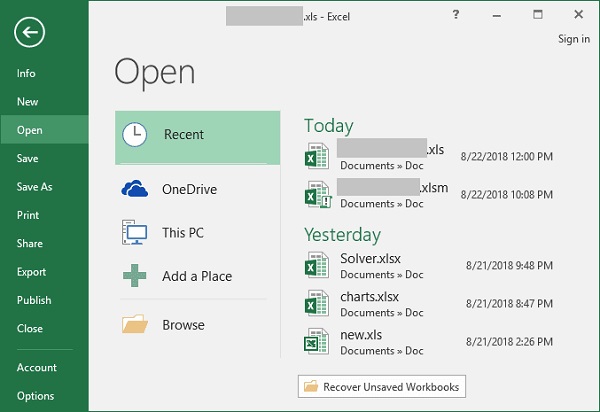
Step 3: Select the needed file and click Open.
Step 4: When the document open in Excel, remember to click the Save as a button in the yellow bar above your worksheet and save the file to the desired location.

Tip: Change Excel AutoSave Location and Settings
You can decide where to save autosave files in Excel and also how long should Excel autosave a document.
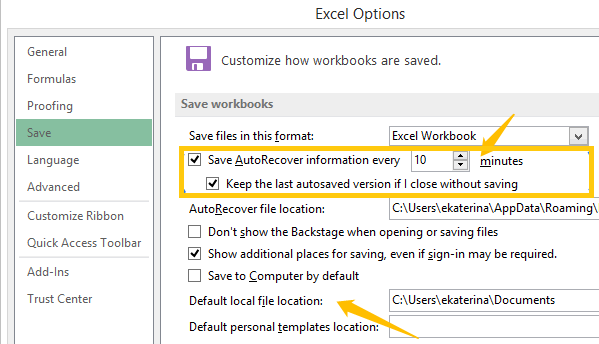
Step 1: Go to Excel autosave settings on your computer.
- Microsoft Excel 2013 and 2016 AutoSave Location: In Excel, click File > Options > Save.
- Microsoft Excel 2007 AutoSave Location: Click the Microsoft button > Excel > Save.
Step 2: Make sure both the Save AutoRecover information every X minutes box and Keep the last autosaved version if I close without saving box are selected.
Step 3: In the Save AutoRecover information every X minutes box, you can shorten or lengthen the interval as you like. In the AutoRecover File Location box, you can also decide where to put your saved file.
AutoSave Not Working? Restore Unsaved Excel Files in This Way
Though AutoSave is a very useful function, like all the other built-in features, it does not work well all the time. In fact, we have heard users complain from time to time that, even though they have seen the taskbar shows that Excel auto-saved their file many times, they have no luck in getting the latest saved version. That would be a nightmare if your efforts devoted to work are in vain. But, don't be upset or panicked, a professional data recovery, FonePaw Data Recovery, for example, can be your great help. The program can recover lost or deleted Excel files, word documents and more from your Windows computer. In just a few steps, you can have your lost excel file back.
Step 1. Download and Install FonePaw Data Recovery
Free Download Buy with 20% off Free Download Buy with 20% off
Step 2. Select "Document" and Start Scanning
In the homepage, you can select file type and hard drive for the data recovery to scan. If you want to find your lost Excel workbook, click "Document" and the hard drive where you have lost it, for example, Disk (C:) , then click "Scan" to start the process.
Step 3. Preview The Scanned Results
FonePaw Data Recovery will present the scanned files in two lists, one is type list where all the data are categorized according to their formats; the other is Path list in which the founding documents are classified by their location.
In Type List, Select ".xlsx" . If there are ".xlk" documents, you should also select them, because ".xlk" document is the backup copy of Excel file.
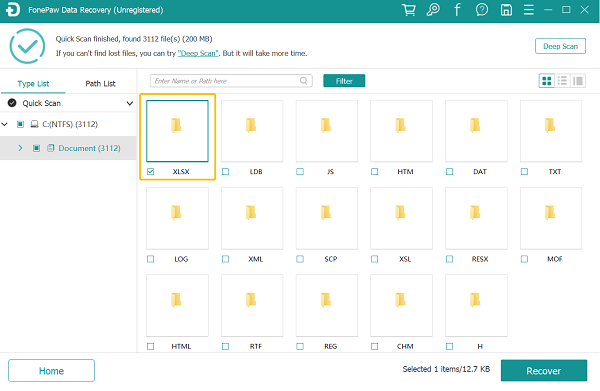
Step 4. Recover The Lost Excel File
When you find the lost Excel file, select it and click Recover, then it will be safely put back to your device. If your excels are corrupted but you still need them, this way also works to recover the corrupted excel files.
Tips on Saving Excel Files
Though AutoSave and AutoRecovery are great features; data recovery is also a good tool, they are just temporary remedies. A good habit of saving important data and an awareness of preparing a backup of your Excell files can save you much trouble in the long run. Follow our bonus tips on how to save Excel files.
Shorten The Interval of Excel AutoSave
The amount of new information that the recovered Excel file contains depends on how frequently Excel auto saves the file. If your file is set to be auto-saved every 10 minutes, your newly input data of the last 8 minutes won't be contained when encountering a power failure or computer crash. Therefore, to save as much information as possible, you can enter a small number in the minutes box. The more frequently your Excel worksheet is saved, the more chances you will recover a complete file.
Backup Excel Files
A less commonly known feature of Excel is Auto Backup. In fact, this is a very useful function, for it can not only help you avoid losing important data, but it also allows you to have access to the previously saved version of your workbook. If you enable this function, the moment when you save the file, an Excel backup file will also be created with a ".xlk" extension. You don't have to worry that your file might disappear, for you can always refer to the backup.
Since the backup file is always one version behind the current version, if you make a bunch of changes to the file, save it but suddenly change your mind and want to get back to the previous version, you could just open the backup file, too. This will save you much trouble of rewriting the data.
To enable this feature, do as the followings:
Step 1: Go to File> Save as >Computer on Excel.
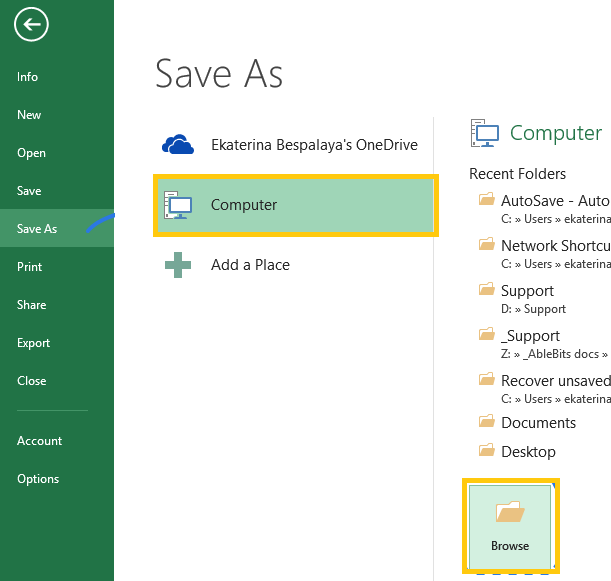
Step 2: Click the Browse button.
Step 3: When the Save as dialog window pops up, click the drop-down button of the Tools button which is at the lower right corner.
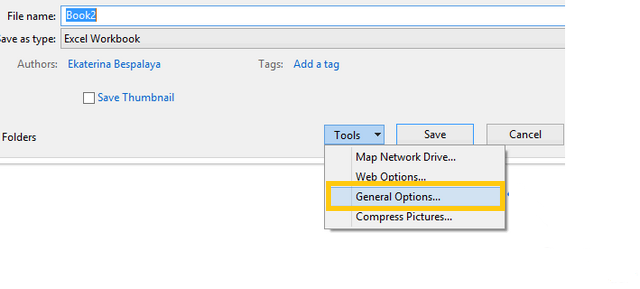
Step 4: Among a couple of options, select General Options> Always create backup.
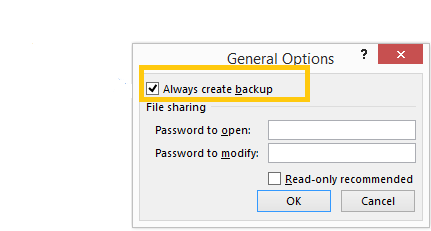
Step 5: Click OK. Now a backup copy will be created automatically every time you save your file.
After reading this article, do you have a better understanding of how to recover unsaved Excel files? Remember, if they fail to work, you can turn to FonePaw Data Recovery for help. And don't forget to form a habit of saving files in time and always preparing a backup!


