The post-epidemic period has arrived, but Zoom for online meetings, interviews, and webinars is still going strong. And on Zoom, nothing is more convenient to summarize first-hand meeting materials or important information than recording a Zoom meeting directly. But do you truly know how to record Zoom meetings on Windows and Mac, even without permission?
In this post, all detailed Zoom audio and video recording methods will be compiled for you, be third-party screen recording tools or Zoom built-in features. And right now, let's dive in!
Can You Screen Record a Zoom Meeting?
The answer is affirmative. And there are two ways you can apply to record Zoom meetings on Mac and Windows. One is local recording and the other is cloud recording.
- Local recording: Available for free and paid users, local recording can be launched by the host or the participant that has been given privilege from the host.
- Cloud recording: Specially designed for companies or related personnel, cloud recording is a kind of advanced mode and can only be applied by hosts or co-hosts that are already subscribers.
Generally speaking, local recording is fairly enough for personal use or normal groups on Zoom. But as a participant, recording permission is a floating privilege. You can be granted, and you can be removed at all times as well. So for complete and stable recording of Zoom meetings, you might as well try some best third-party Zoom meeting recorders. With their help, recording Zoom meetings without permission on Mac and Windows is as easy as pie.
Method 1. Record Zoom Meeting Without Permission with Professional Screen Recorder
Full of record and trim features, Zoom video audio recorders specialized in recording Zoom meetings without permission in an easy manner. And FonePaw Screen Recorder, the best of them all, is highly recommended to you.
As an all-in-one desktop application, FonePaw Screen Recorder can enable you to record the whole Zoom meeting with any layout, be an active speaker, gallery view, or share windows with or without thumbnails. Moreover, unlike Zoom's built-in recording feature, FonePaw Screen Recorder will not trigger any notification to the host. That is to say, you can truly make your Zoom recording without permission with this great software.
Besides, FonePaw is versatile. Not only can it output Zoom recording videos with full voice in high-res quality, but it can also modify the videos. Annotation allows you to add text or graphic notes to the video, and the trim feature can do some clips to make your Zoom recordings better before exporting.
More than that, some other helpful features are worthy of your exploring as well, for example:
- It can record your screen with facecam, system sound, and your voice simultaneously or respectively.
- It supports customizing recording areas, setting frame rates, etc.
- It supports real-time annotation like adding texts and arrows to the recording/screenshot.
- It can change its screen capture modes with the difference of computer.
- It boasts various output formats, including MP4, WMV, MOV, F4V, AVI, TS, or GIF.
- It supports watermark and screenshots.
All these sparkling features festoon FonePaw Screen Recorder and make it countable. And now, you can follow the tutorials below to try this workable software first.
Free Download Buy with 20% off Free Download Buy with 20% off
How to Record Zoom Meeting Without Permission on Laptop with FonePaw
Step 1. Download and install
Download FonePaw Screen Recorder and install it according to the introductions.
Free Download Buy with 20% off Free Download Buy with 20% off
Step 2. Click Video Recorder
Open your Zoom meeting. Then launch FonePaw Screen Recorder and choose Video Recorder on the main interface.

Step 3. Setting up before recording
Now you can see four sections that you can customize before recording. You can select the recording area according to your needs first. And then remember to turn off the webcam button, or it may interfere with Zoom.
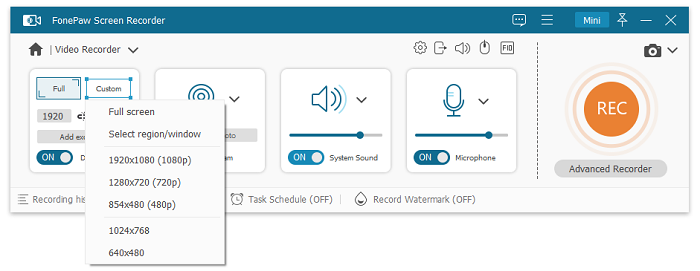
FonePaw Screen Recorder supports recording system sound and the microphone simultaneously, which can also work when you plug an earphone into your computer. To make sure all members' sounds will be included, you can turn on the system sound and the microphone together.
Step 4. Start recording
With all the settings done, you can begin to record a Zoom meeting by clicking the "REC" button.

 Tip:
Tip:- You can also click Task Schedule to schedule an automatic recording for your meeting.
Step 5. Advanced features
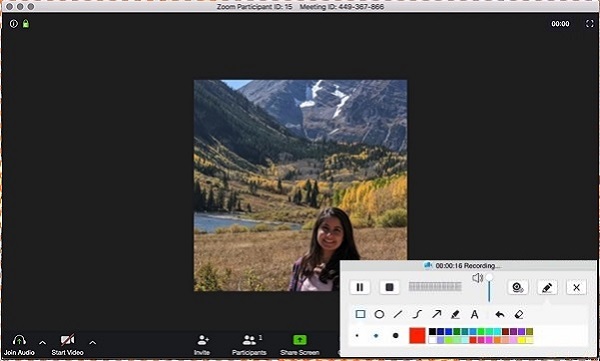
You can freely use the drawing panel to add annotations or take screenshots during the recording. If you want to end it, click the red button to stop the Zoom recording anytime you like. Also, you can cut the unwanted parts from your recording with the Clip feature before saving the Zoom video locally.
Method 2. How to Record Zoom Meeting Without Permission Free with OBS
When it comes to OBS, you may think of its open-source nature and recording feature. And right because of these characteristics, you can utilize OBS to record Zoom audio and video without permission. Same as the steps to record games or other platforms with OBS, you can refer to the process below to have a nice try.
Step 1. Launch OBS on your computer first. If you don't have one, please click here to install it.
Step 2. Before recording, you can go to "Setting" to change the output folder by browsing the "Recording Path".
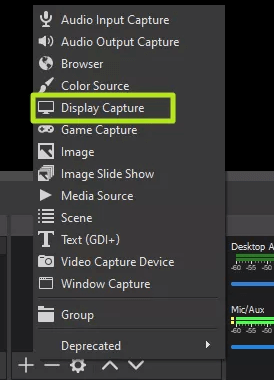
Step 3. Return to the main interface, and click on "+" >> "Display Capture" to select Zoom as the new recording source.
Step 4. Now, you can see a pop-up window named "Create/Select Source", and you need to name your new source and confirm it.
Step 5. Set up the capture method and display, tick off "Capture Cursor", and click on the "OK" button. Now the monitor preview will be displayed on your screen.
Step 6. Return to the main interface again to add a sound source. Just click on "+" >> "Audio Input Capture". And then name the source like the step above.
Step 7. Select your input device from the dropdown list and confirm it. After that, you can go to the main interface to tap the "Start Recording" option in the bottom right corner.
 Note:
Note:
- OBS is quite useful and professional, but it is also slightly tedious. So once you can not hold it completely, FonePaw Screen Recorder is always within your reach.
Method 3. How to Record Zoom Meeting Without Permission on Phone (iPhone/iPad/Android)
Using Zoom more often on mobile devices? Compared with desktop clients, both Zoom and recording tools, recording Zoom with audio on iPhone or Android is much easier. But considering the difference between Android and iOS, the built-in recording feature may not come in handy. So for your convenience, the next workable tutorials can do you a great favor.
Record Zoom Meetings with Audio on Android
For Android users, not all Android phones have inbuilt recording tools. So to make Zoom recording work smoothly, you can take AZ Screen Recorder into account.
Step 1. Download AZ Screen Recorder on your phone first.
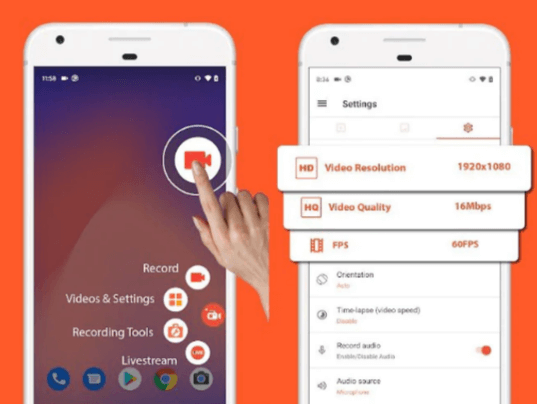
Step 2. Once you open this Android recorder, its tool panel will appear on your device. Now you can do some preference settings to change the configuration.
Step 3. Now you can start to record Zoom meetings with audio on Android by tapping on the "Red" button in the AZ overlay.
Step 4. When all Zoom recordings are finished, you can click on the square "Stop" button to make it done.
Screen Record Zoom on iPhone/iPad
Contrary to Android, the iOS inbuilt recording feature is pretty practical. No more application installation, you can screen record Zoom on iPhone or iPad with no sweat. And the tutorial below is exemplified by iPhone.
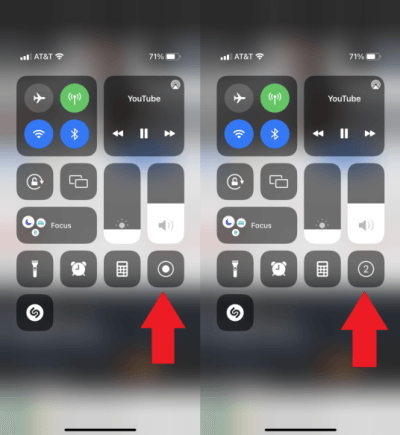
Step 1. Open "Settings", find "Control Center", and select the "Customize Controls" option.
Step 2. Tap the green add icon closely next to the "Screen Recording".
Step 3. Swipe down the screen to open the "Control Panel" and tap the "Record control". Now wait for the countdown to end and the recording will start automatically.
Method 4. How to Record a Zoom Meeting as a Participant Online
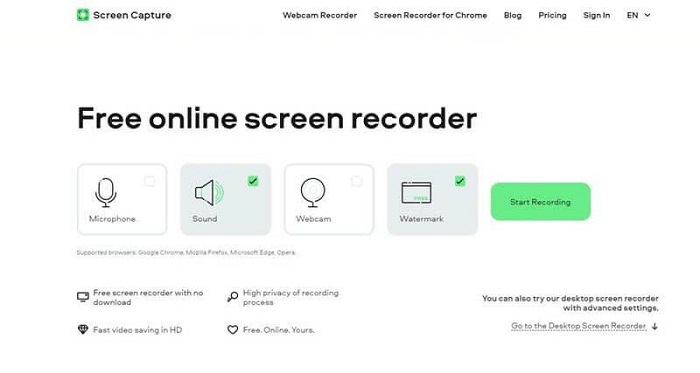
Instead of installing an extra desktop application, using an online Zoom recording tool can also reach the aim of recording Zoom meetings without permission on Mac and Windows. And here Screen Capture is strongly recommended to you. This simple but powerful Zoom video audio recorder can work smoothly on all mainstream browsers. Better yet, simple design leads to simple usage. You can follow the guide below to process the Zoom recording online.
Step 1. Click here to enter the online Zoom recording tool.
Step 2. According to your needs, choose the microphone, system sound, and watermark.
Step 3. Open the ongoing Zoom meeting and click on the green "Start Recording" button to begin the Zoom recording with audio.
 Note:
Note:
- Online Zoom recording tool stable network. In case it fails you, you can prepare FonePaw Screen Recorder as a backup.
FAQs of Recording Zoom Meeting on Mac/Windows
How to Start Recording on Zoom with Built-in Feature?
To meet the needs of the public, Zoom already provides users with a recording feature so that you can easily record a Zoom meeting as long as you are a host or have been privileged by the host.
Give Permission to Record on Zoom
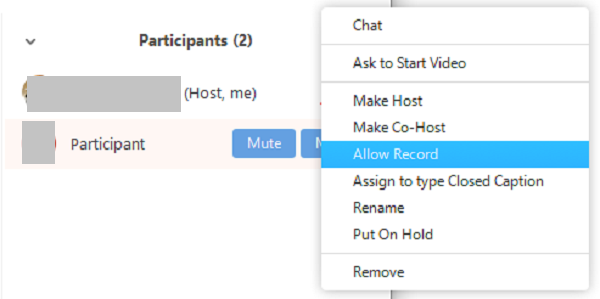
Step 1. Click on Manage Participants in a Zoom Meeting.
Step 2. Click "More" next to the name of the participant who will be privileged.
Step 3. Select the option "Allow Record". And the participant will receive a permission notification.
Step 4. When the participant is recording, a red bubble will be displayed next to the user's name.
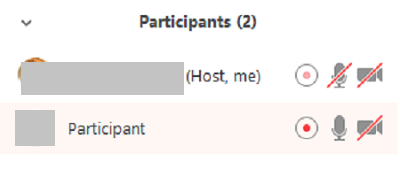
Step 5. The host can disable the participant's ability to record by repeating Step 2, then selecting "Forbid Record". The participant will be notified as well.
Record Zoom Meeting as Attendee
Step 1. Join a meeting. Click "Record" at the bottom-right of the screen.
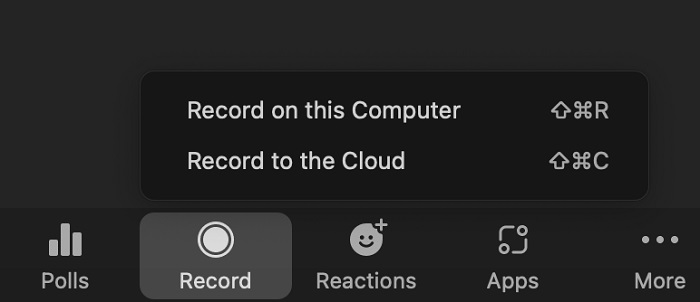
Step 2. Select "Record on this computer", and The recording will begin.
Step 3. You can control the recording by clicking the "Pause" and "Stop" buttons.

 Tip:
Tip:- 1. If you click "Pause", the recording will be tagged and you can restart it again.
- 2. When you select "Stop", the mission will stop at once and a pop-up will tell you that "the recording file will be converted to mp4 when the meeting ends".
Step 4. After the meeting has ended, Zoom will convert the recording and keep it in a folder.
 Tip:
Tip:- You can start a Zoom meeting recording with keyboard shortcuts.
- On PC, activate a recording by the "Alt+R" shortcut;
- On a Mac, it is "Up Arrow + CMD + R"(local recording) or "Up Arrow + CMD + C" (cloud recording).
Q2. Where are Zoom Recordings Stored on Mac/Windows?
If you have trouble finding Zoom recording files, you can read the introductions below to check your recordings.
How to Find Zoom Recordings on Mac/Windows
If it is a local recording, the file should be saved in the default location:
- On PC, go to C:\Users\User Name\Documents\Zoom.
- On Mac, go to /Users/User Name/Documents/Zoom.
To view a local recording file of a Zoom meeting, you can:
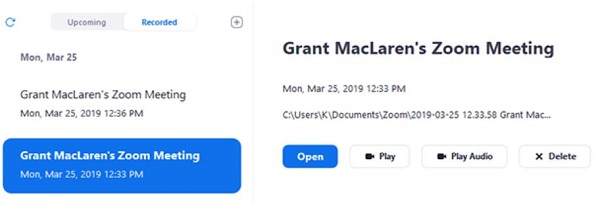
- Open Zoom desktop, click Meetings;
- All the meeting recordings are shown under the Recorded tab;
- You can open or play the recording file.
How to View Zoom Recordings on Cloud
If the recording files are saved to your cloud storage, you can access and download the files in the following steps.
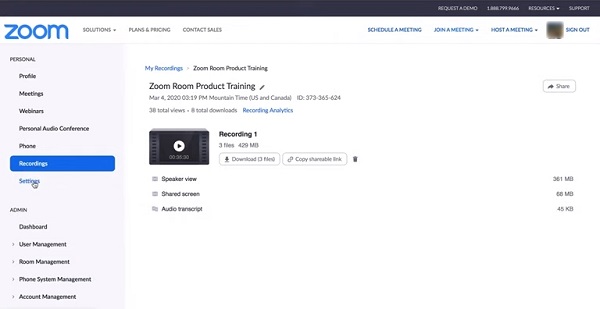
- Open the Zoom web portal;
- Click Recordings to view all the meetings that you have recorded;
- Click the Download button next to a recording to save the Zoom recording in MP4 files.
Conclusions
That's all about how to record Zoom meetings without permission on Mac and Windows. You can pick one method that suits you most, but you should give FonePaw Screen Recorder a top priority. For one thing, suffused with adequate features, this all-purpose program can help you make Zoom recordings without any limitations; for another, its versatility always surprises. Not only can it record gameplay but it can also record discord calls with its other two functions – Game Recorder and Audio Recorder. With FonePaw, you can always manipulate various videos at your fingertips. So why not give it a shot?
Free Download Buy with 20% off Free Download Buy with 20% off


