There is no built-in screen recorder to record screen on Windows 7. Then why not try FonePaw Screen Recorder to capture your screen with sound? Flooded with all marvelous features, you'll find it's never been easier to record a screen with FonePaw Screen Recorder.
Free Download Buy with 20% off Free Download Buy with 20% off
Windows 7 can be considered dated today. Such a simple question of how to screen record on Windows 7 seems difficult to figure out. In fact, Windows 7 isn't equipped with any app that can record its screen activities smoothly.
You may have to turn to some third-party recording tools for help. And for your convenience, this post has compiled 3 feasible ways that can make you record screens on Windows 7 with or without any app. Now, let's dive in!
How to Screen Record on Windows 7 Using a Screen Recorder (The Easiest Way)
To record screens on Windows 7, there is no more convenient way than to use professional screen recording software directly. In this case, FonePaw Screen Recorder, an industry-leading screen recorder for Windows 7, is strongly recommended to you.
As an all-purpose desktop recorder, FonePaw Screen Recorder can be applied in various scenarios. Not only can it record screen, audio, and webcam on Windows 7, but it also specializes in gameplay recording.
Meanwhile, embedded with some useful tricks and advanced features, this top-rated program can surprise you inadvertently. Recording area customization and noise cancellation can help you produce flawless audio-visual images. Annotation, clip, and other beautification features are effective means to make your screen recording more varied, entertaining, and interactive.
Not just that, many features that can make it easy for you to record video on Windows 7 are worth exploring, for example:
- It can screen record on Windows 7 with high-res quality;
- It boasts various output formats, including MP4, MOV, AVI, F4V, MP3, WMA, AAC, etc.;
- It supports real-time annotation (text, arrow, or graphic) and snapshots during the recording;
- It allows you to schedule tasks that can begin and stop the recording automatically;
- It equips hardware acceleration that can enable you to record computers more smoothly;
- It can customize hotkeys to control screen recording with ease;
- It exports videos without any watermark.
With many sparkling features, FonePaw Screen Recorder requires simple steps to record the screen on Windows 7 with sound. Now you can walk through the tutorials below to start Windows 7 recording.
Step 1. Download and install FonePaw Screen Recorder on your computer. And then launch it and click on the "Video Recorder" option for video screen capture.
Free Download Buy with 20% off Free Download Buy with 20% off

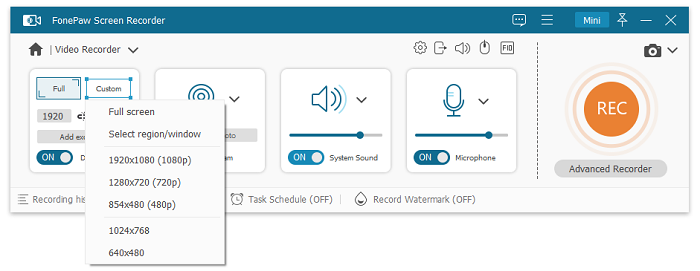
Step 2. Based on your needs, select the recording area, webcam, microphone sound, or system sound. If you want to have a clearer soundtrack, you can turn on "Noise Cancellation".
 Tip:
Tip:
- It is recommended to operate a "sound check" before recording. Click the gear icon > Sound to enter advanced sound settings.
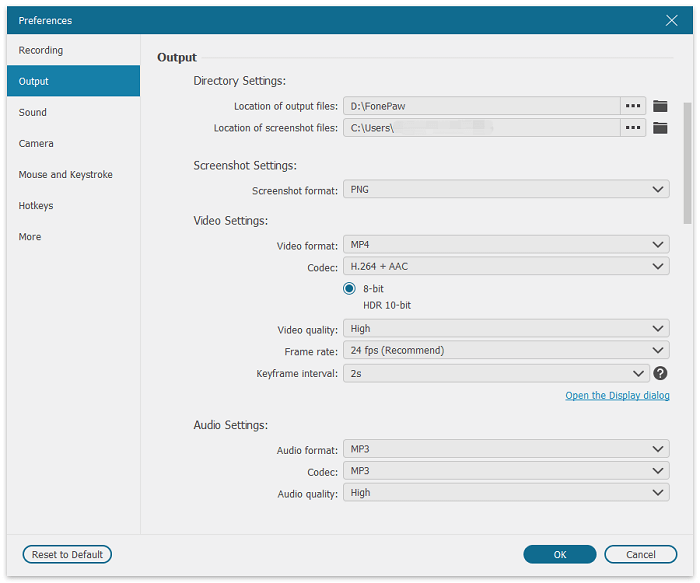
Step 3. If you are using FonePaw for the first time, you can also tap the "Three-line" button to do some output preference settings. Just choose "Preferences" >> "Output" where you can change the save path, output format, and quality.
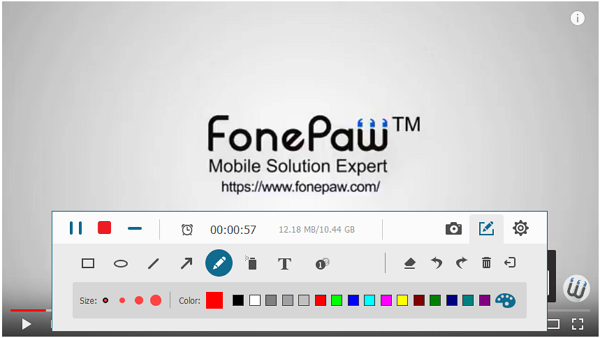
Step 4. When you have finished all preparations, you can just click on the red "REC" button to start recording on Windows 7. And during the recording, you can take screenshots or add annotations (text, line, circle) to your screen video.
 Tip:
Tip:
- You can also schedule your recording by clicking the clock icon and entering the duration of the screen recording.
Step 5. Click the "Stop" button to stop filming. Then, you can preview, edit and save the video on Windows 7. You can also upload it to YouTube, Vimeo, and Twitch.
How to Screen Record on Windows 7 Without any App
Although no built-in screen recorders are provided on Windows 7, there are two applications that generally come pre-installed that will save you from having to download extra screen recording software. One is PowerPoint, and the other is Problem Steps Recorder. And in this part, you can learn how to use them to record screens on Windows 7 without any app installed.
Video Record Your Screen on Windows 7 with Powerpoint
PowerPoint, a frequently-used productivity application, can do you a great favor when it comes to screen record on Windows 7. It can not only record on Windows 7 with audio, but it can also allow you to save the recording as a separate video file. And here is how to record the screen on Windows 7 with PowerPoint
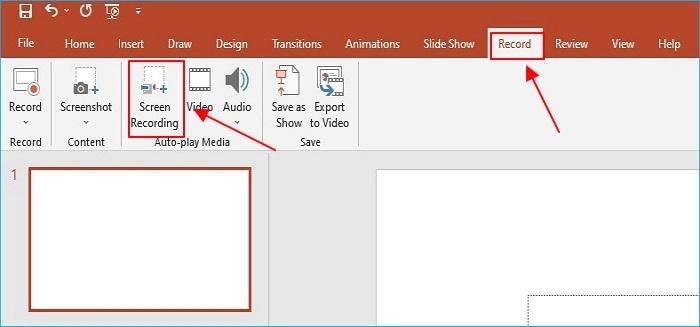
Step 1. Launch PowerPoint, and create a new slide. Then head to the "Record" tab and click the "Screen Recording" button.
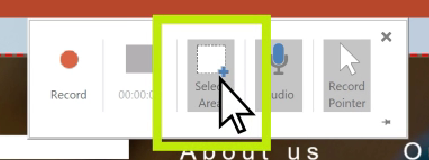
Step 2. Now you can see a screen recording dock appear. To proceed with recording, you need to click the "Select Area" button to customize a specific region that you want to record.
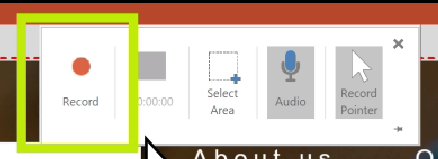
Step 3. Once you are ready, click on the "Record" button to start capturing your screen on Windows 7. And during recording, you can do some annotations.
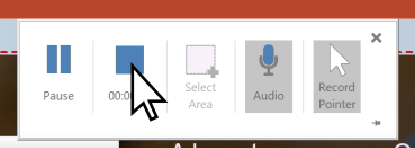
Step 4. When you want to finish the recording, you can click on the "Stop" icon, and the recording will be saved and embedded on the slide you open.
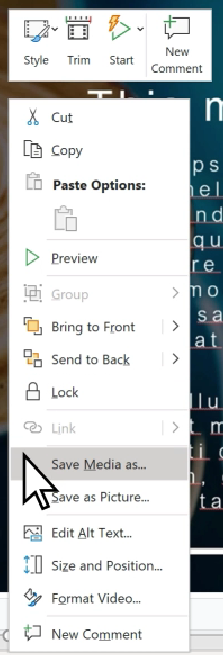
Step 5. To save the recording videos, you need to right-click on the "video frame" and select "Save Media as".
Record Your Computer Screen on Windows 7 with Problem Steps Recorder
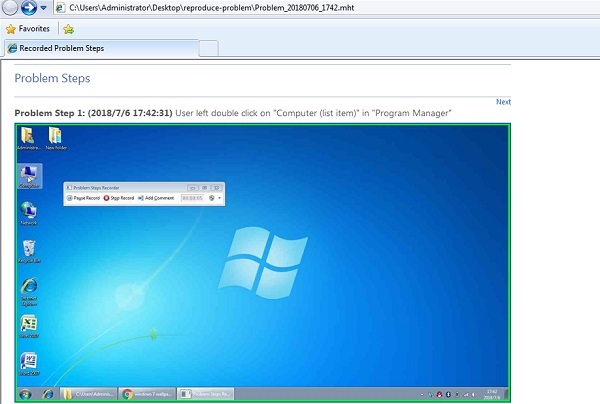
Problem Steps Recorder is not a video capture tool in the usual sense, but it can indeed record your activities, especially every step happening on your computer. It is often used to record problems that occur during the use of a computer or to show how to use a program or software step by step. And the detailed process is as follows:
Step 1. To find Problem Steps Recorder: "Start button" > "Accessories" > "Problem Steps Recorder"
Step 2. The Steps Recorder window will show up. Click "Start Record" to begin the recording on Windows 7.

Step 3. Go through all the steps you want to record. And when recording, you can select "Add Comment", use your mouse to select the part of the screen that you want to comment on, type your comment, and then confirm it.
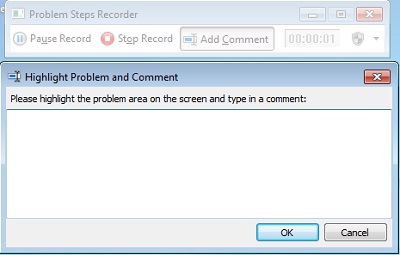
Step 4. When you are done, click "Stop Record". The recording will be saved as a .zip file, which can be unzipped later and viewed by a web browser.
FAQs About Screen Recording on Windows 7
Can I Screen Record on Windows 7 with VLC?
Yes, the answer is positive. With Advanced Controls set up on VLC, you can record desktop activities as well as YouTube live-streaming videos. But VLC, a common media player, will come across some recording errors. It cannot capture the mouse cursor for one thing; for another, this player fails to record video and audio at the same time.
But these problems can be resolved with no sweat. If you want to record the screen on Windows 7 with sound using VLC, you can refer to the post called How to Use VLC to Record Video, where you can view the workable solution and the tutorials on recording screen on Windows 7 with VLC.
How to Record Gameplay on PC Windows 7?
Windows 7 may be dated, but it is an optimum platform for some games to run on. And to record these games, you might as well give FonePaw Screen Recorder a shot. Its specialized "Game Recorder" is the most well-matched to Windows 7.
FonePaw Screen Recorder can record all games that can run on Windows 7. Better yet, it supports recording in high and even lossless quality. And the output frame rate can be up to 60fps, keeping the visual quality close to the original gameplay.
Conclusion
To wrap up, 3 workable ways to record screens on Windows 7 have been introduced to you. But in comparison to the three, PowerPoint and Problem Steps Recorder are practical, but too simple and rough to finish some complicated recordings on Windows 7.
By contrast, FonePaw Screen Recorder can complete the most diverse recording tasks with the simplest design and operation, be it ordinary desktop recording or professional gameplay recording. So why don't you try it now?
Free Download Buy with 20% off Free Download Buy with 20% off


